You want to create a website and get online but don’t have a clue where to begin? You want a professional website but don’t have the technical skills to build one or think that it’s too hard?
There is so much information on the internet. It’s often confusing and difficult to understand where to begin.
Fortunately, this guide will cover the steps even a beginner can take to create and build a professional looking website without breaking the bank!
Actually, in most circumstances, it can be totally free!
We’ll give you all the information you need to make an informed choice. You will avoid the many mistakes that can be made when building a website. You will learn the best way to build a website that has solid foundations. That is future proof and most importantly is search engine friendly.
All without learning any overly complicated programming languages.
But before you begin…
This guide isn’t here to sell you super web hosting. Not even to send you elsewhere via affiliate links to sign up with a website builder, NOPE. It’s here to guide you in easy manageable steps to create a professional looking website that will be the envy of all.
Our recommendations and tips will help you to not make the same mistakes we did all those years ago.
The only assumption is that already have a domain name registered and have your unlimited web hosting plan ready to go (If not we will cover this below).
So, let’s get started and get you on your way to building a website…
Step 1: Choosing a CMS Platform. Your options
You need to choose a platform as a foundation to build your website on. There are a number of options with literally hundreds of website builders and CMS (content management systems) to choose from.
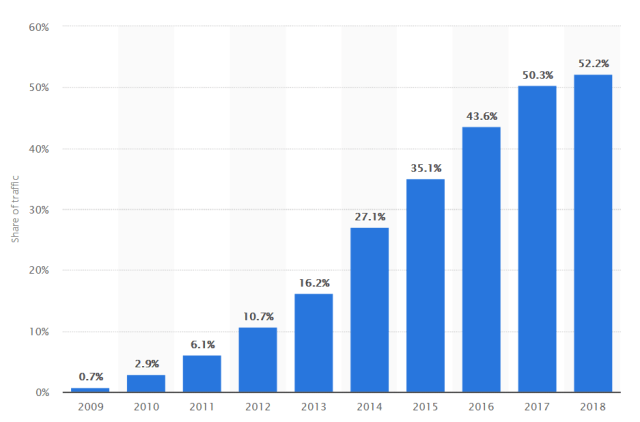
One thing to note is, regardless of which platform you decide to use your website will have to be mobile friendly. Worldwide website traffic generated by mobiles is increasing year on year.
52% of worldwide traffic in 2018 now generated by mobile users:
We are going to quickly cover the most popular options giving you the pros and cons of each option and then give you our recommended solution.
Online Website Builders
Over the year’s website builders have become very popular. They don’t need any HTML or coding knowledge. Nothing to install or setup.
The most popular website builders are Wix, Weebly and Squarespace. Hell, even your web hosting provider can give you access to a website builder.
It’s very easy to start. There is nothing to download or install. Simply choose your preferred website builder, signup to a plan that’s right for you and prepare to build a website. That’s It!
Out of all the platform options, it’s the easiest and simplest to get started on. All you need is your domain name and even that can be purchased during signup, yet, we don’t recommend that.
Once you are signed up, you will start off by choosing a style from a handful of templates based on your niche. All the included templates for the majority of website builders are mobile friendly so that’s something you don’t have to worry about.
Once you have selected a preferred template you can start to add in your own content and create the pages of your website.
After choosing a template you can make those default pages a little more unique. Start by adding in custom images, text boxes, forms and other elements via widgets. Essentially you drag and drop elements into a pre-configured position in your newly created page.
Most parts of the site can be customised. The header and footer can also be customised to suit the needs of your site as well as the standard pages like your contact and about page.
Keep in mind that although these pages can be customised, it is in a limited way. You don’t have full control!
Once you’re happy with all your changes all you have to do is click the publish button and your website will be live! It’s very easy and straight forward.
Although online website builders are easy to use there are some limitations and disadvantages to using them. For one, you cannot fully customise each and every part of the site. Some sections of the template are locked and cannot be changed.
They are generally not very search engine friendly either read this for more information. Granted there has been some improvement over the years however this is nothing in comparison to the other options available (discussed below). The last thing you want is to build a website that is not search engine friendly.
Another not so obvious limitation is the ability to grow. Website builders are great for starting off a new project which is relatively small but once things start to take off the limitations kick in.
Often to give your site a little more power and more options you have to typically upgrade your plan. This can be quite expensive and not the best option for your site for the long term.
Well, that’s ok you say. I will simply move my site to another solution when that time comes. Errm. NO.
That’s not an option. It’s near enough impossible to migrate and move your site to another solution. Your website will be dependent on the online website builder platform you signed up to.
If you are lucky enough to have the option to migrate your site then you will find that it doesn’t look like or work like it previously did on the new platform. Essentially you will have to start all over again.
Pros
- Affordable start-up plans.
- Quick and easy signup & setup.
- You can use your own domain.
- No need to learn any HTML/CSS code.
Cons
- Limited ability to customise the full site.
- Your website is platform dependent.
- Not very search engine friendly.
- Not scalable compare to other options.
CMS (Content management systems)
There are 2 different types of CMS’s (content management systems). Enterprise CMS solutions which you have to pay for (and come with full support) OR open source CMS solutions which are free to download and use (maintained by developers and vibrant communities).
For our purposes, we will be focusing on open source CMS’s which are free to install/download and easy to use for beginners.
There are many open source (free to use) CMS solutions available. The most popular ones being WordPress, Joomla and Drupal. Each has its own unique benefits, set of available templates (free & paid) and plugins to enhance functionality. Each one also has extensive communities to help you out if you get stuck.
However, unlike online website builders where you don’t need any HTML or coding knowledge a little HTML/CSS knowledge may be required at some point when building your site with a CMS. Don’t be afraid though the required amount of knowledge will be minimal and basic at the most.
So which CMS is going to be the best? You need to carefully choose the right CMS for your website. To do that lets firstly look at some stats. What are other websites being built with around the internet?
According to statistics in 2019, there are just under 200 million+ active websites. That’s more than triple the number of active websites compared to 2010.
Let’s firstly look at what CMS is being used the most and what’s most popular. Looking at recent stats collected by the website Builtwith we see:
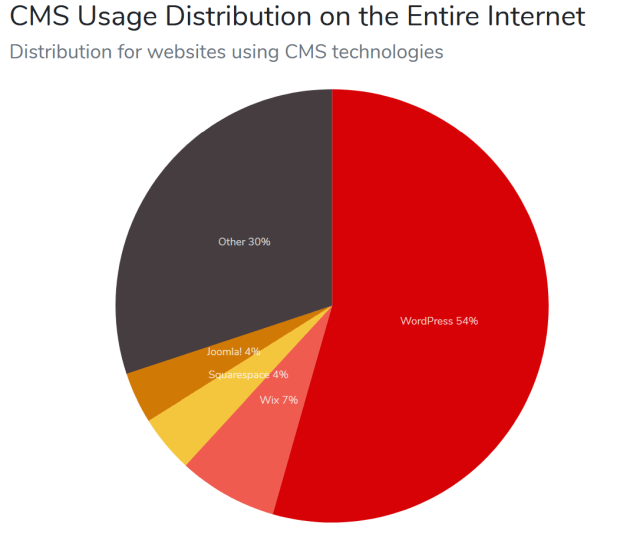
Source: https://trends.builtwith.com/cms/traffic/Entire-Internet
From the chart above you can see a whopping 54% of all sites on the internet use WordPress! That’s huge. But wait let’s drill down a little further. Let’s take a look at the stats for the top 1 million websites by the traffic they get to see what CMS they use:
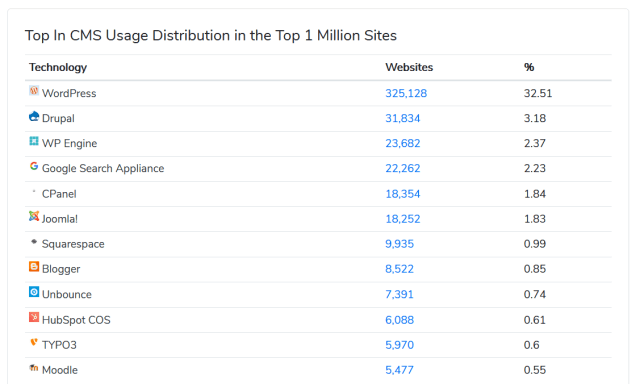
Looking at that chart we see yet again that WordPress is a clear winner. It has over 32% usage of all the top 1 million websites followed by Drupal with 3% and the Joomla with 1.8%
So which CMS do we choose? Let’s look at the pros and cons of the 3 top CMS to decide: WordPress, Drupal & Joomla.
1. WordPress Easily the most popular CMS from the top 3.
As of writing version 5.2 has been downloaded over 13 million times. That number is growing daily.
Using WordPress is a breeze. It’s newbie friendly. If you can use traditional programs like Word and Excel then using WordPress should be a doddle. It’s intuitive and easy to use editor makes it easy for beginners to create content and update pages throughout their website. It’s one of the biggest strengths of WordPress.
WordPress is also famous for its 5-min install. It’s so simple to set up and install and all in 5 mins (usually a lot less).
In 2018 Google announced a partnership with Automatic the authors of WordPress. They plan to make the platform, even more, faster for mobile device users.
Not only is this a clear sign of the importance of having a mobile-friendly website but a gentle nod that WordPress is the CMS platform of choice for the biggest search engine on the planet!
It’s good news on the mobile front, WordPress has got you covered. It offers you a huge range of free themes that are responsive & mobile friendly, available to download and use right from the admin area. Simply click and choose your favourite theme. It’s applied to your site immediately.
All the themes available from the WordPress repository are mobile friendly. It’s an actual requirement by WordPress that any themes available on the repository are responsive & mobile friendly. Otherwise, they don’t get included.
There are many market places on the internet with the most popular being ThemeForest. Every conceivable niche/industry is catered for. You’re sure to find a premium offering to meet your needs.
Although these are premium themes, they are still very easy to use. Many of them also include premium page builders. These take the creation of content and page layouts one step further:
Again, these premium offerings are mobile friendly. Any elements that use within your content or page layouts can also be independently controlled to display on different screen sizes via the settings box.
Another huge plus point for WordPress is that its search engine friendly out the box. The platform gives you SEO friendly URL options, optimised core code and SEO friendly HTML mark-up that the search engine will be sure to love.
It’s been highly recommended by Google’s former head of webspam team Matt cuts as long ago as 2009. He stated that over 80% of the mechanics required for SEO is present in the WordPress platform.
You can’t get a better endorsement than that, now can you?
Of course, you can further enhance the built-in SEO capabilities available with plugins. One of the most popular plugins is Yoast SEO. This provides in page analysis of how well your content is optimised. It also looks after the meta code and HTML information that search bots can read.
To take it one step further. Add in a robust JSON/Ld plugin which will provide even more SEO and social information for the search engine bots to consume! All easily managed from the WordPress admin:
Plugins are not just for beginners but also for advanced users. It’s very simple & easy to customise and extend the functionality of WordPress with any number of plugins so that you can create a really complex website if that’s what you need.
To date, there are over 54, 930 free plugins available in the official WordPress repository. There’s definitely a solution available for your custom requirement.
99% of the time free plugins available in the repository are more than enough for your websites need. If you need something more custom then there are many more premium plugins available.
Purchasing a premium plugin from a market place like ThemeForest or from a vendor like WooCommerce can for example instantly transform your website to a fully functional ecommerce store!
Performance and security isn’t something that’s compromised either. Often many users of WordPress will complain that it’s a little resource hungry or it’s not secure. That’s dependant on the way the platform itself is set up and configured.
A poorly developed theme and using poorly built plugins are often the culprits. A bit of common-sense can-do wonders here. Installing every plugin known to man isn’t very sensible. Even using a theme that’s been downloaded off some dodgy website is a big no-no.
If you have been sensible with your choice of plugins and also chosen a good theme then you should already have a pretty fast & secure website. You can further speed up your site by using the right web hosting. Combine that with a cache plugin your pages will load on your site super quick.
WordPress can accommodate even the largest of websites and still be super-fast with sub-second load times. You just have to know how to set it properly and use the right resources.
Older versions of WordPress weren’t known to be super secure. It used to get a lot of bad press. The platform didn’t come with security updates as standard.
However, all that changed with version 3.7. WordPress introduced security and maintenance updates as standard which were all automated. You now don’t have to manually apply patches or update files. Its all done in the background for you.
To further enhance and secure your install you can use specific plugins. Some of the most popular ones like iThemes security and
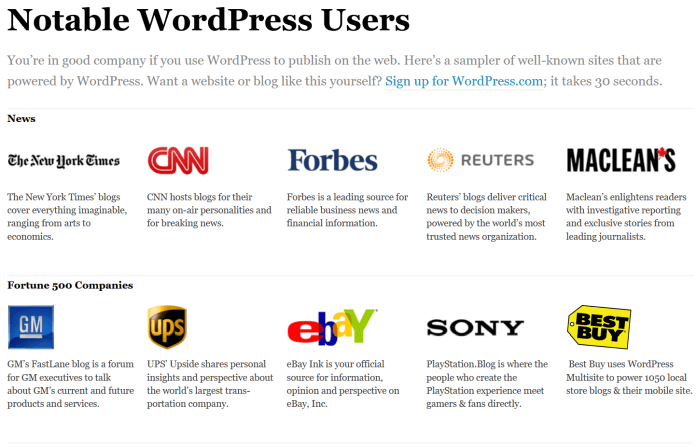
You’re in very good hands with WordPress. It’s a trusted platform for many of the busiest websites in the world. It can handle pretty much anything and is highly scalable. It’s used by some giant notable companies like Sony, CNN and eBay to name a few:
So, you might be thinking about what this is going to cost you? Well the WordPress CMS itself is free to use and download. Many features that you will need are included as standard. To further enhance the basic functionality you can use plugins. 98% of the time these plugins are available free from the official plugin repository. SO, the cost here is NIL.
The only time it may cost you any money is when:
- You need a premium plugin that provides you with enhanced functionality OR
- A premium theme for a look and feel that you can’t find with a free alternative.
Typically for a premium plugin or theme, you would be paying in a range from $40 upwards. That’s pretty reasonable and affordable.
If the premium offerings and help from the community still don’t address your requirements then you can seek a freelance professional to implement complex code you require on your site.
The popularity of WordPress means that there are many freelancers readily available. They can be hired at affordable hourly rates via platforms like Freelancer & https://www.upwork.com/.
Pros
- Opensource – Free to Download and use.
- Newbie & user-friendly. .
- SEO & Mobile friendly out of the box.
- Highly scalable and extensible.
- Loads of plugins and themes to choose from.
- Fast performance from an optimised core.
Cons
- Requires planning and your time to put in place.
- Basic HTML/CSS knowledge may be required.
- Can be susceptible to security issues.
- Customisation will need advanced knowledge.
All things considered; we think that WordPress is a pretty good CMS for a newbie to use for building a website. Before we recommend it as the No 1 go to platform let’s take a look at the other 2 options.
You may be considering using the wordpress.com option. Click here to find out why we don’t recommend this.
It’s not entirely clear from the outset but WordPress is actually available in 2 flavours. Both of which are built by the same company, Automatic, and uses the same base code.
The first we have discussed above. Which is open source, free to download/use and free to customise to suit your requirements.
Then there is the hosted version of WordPress. Although it uses the same base code it’s restrictive in some areas.
It’s essentially a hosted version of WordPress that’s available with a paid plan (there is a free option too). It’s much like the website builder option but with a CMS ‘twist’.
This is a good infographic that gives you the pros and cons of either WordPress platform:
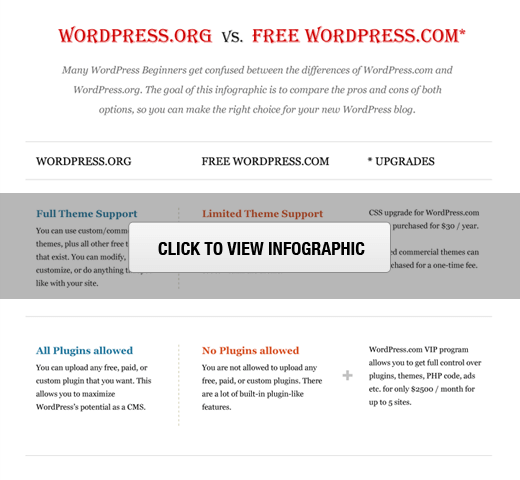
To sum up: the benefit of this option is that you don’t have to worry about installing or setting up WordPress. All the platform updates, security and backups are also taken care of for you, unlike the open source option.
You also get web hosting (3GB plan is free) and a domain name for free too, albeit a subdomain of one of their main domains. SO, it’s pretty hands off and suitable for a new hobby blogger.
But, the restrictions outweigh the positive aspects. You are unable to add in your own themes or plugins (unless you upgrade to an expensive plan). You are thus left to choose from one of their built-in options. Although they are good, we don’t feel they are professional enough.
Secondly, your site will also be scattered with ads. Pages and various sections of your site will contain ads which your users will see. Plus, you don’t make money from them! If you yourself want to sell ads on your site then that’s not allowed.
Thirdly, you are restricted in the type of website you can build. For example, you won’t be offered any ecommerce and/or payment gateway options. You also won’t be able to create any type of membership-based website. Essentially the plans available are suitable only for hobby bloggers and the like.
Lastly, should for any reason they feel that you have violated their terms of use, your site can be deleted without any notice. One day you will have a site and the next day you won’t!
2. Joomla This CMS comes in 3rd after Drupal but we decided to include it next due to it being easier to use than Drupal.
As of writing, Joomla has been downloaded over 104 million times. However, that figure is a little misleading. It’s the total number of downloads. It’s not download numbers based on specific versions as is the case with WordPress.
Like WordPress, it’s an open source project. It’s maintained by a thriving community of solely volunteer contributors. It’s free to download and use with no restrictions.
If you run into trouble then there is an official support channel you can get help from and a community. Although not as big as WordPress it’s very fast to respond to requests. There is also extensive documentation to guide in the right direction.
However, Joomla is definitely not for beginners. Its geared more towards a technical person. Although Joomla has a user interface for you to create pages, change layouts and add in your content again it’s not as beginner friendly as WordPress is.
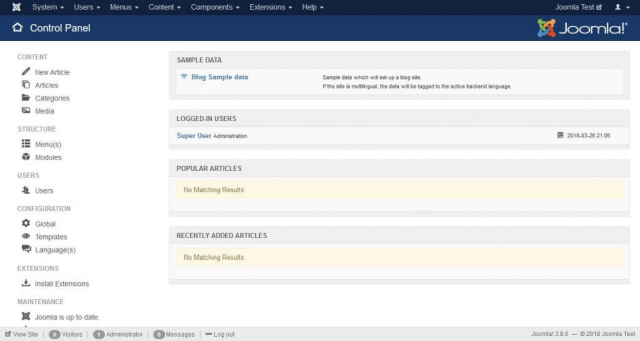
Installing and setting up Joomla is fairly straight forward. It comes with an installation script that automates the setup. Once you have downloaded it and uploaded to your web hosting; the script will guide you through any required steps.
Or, your current web hosting provider may offer the option to install Joomla with 1-click. This will be available from within your hosting control panel.
When it comes to your template/theme options, with Joomla there isn’t a central repository for you to use OR a selection of free themes for that matter. You are pretty much stuck with the default theme packaged with the installation.
The fact that there isn’t a dedicated repository for themes OR free themes readily available in a market place, we think is a huge disadvantage.
You’re forced to use one of the many third-party template developers or market places on the internet. One of the most popular ones is JoomlaShack. It’s been around for a fair few years. It not only provides mobile-friendly templates but extensions too.
When it comes to editing your content and layout the built-in editor is not as easy to use than its counterparts. It’s clunky and not very user-friendly.
Thankfully there are also a few page builders you can use with Joomla too. They are not as readily available for Joomla as they are for WordPress. The functionality is the same if not slightly better. Especially in the layout and settings of the page builder itself:
When it comes to the SEO of the site, there are the standard options available. You can configure your URL’s via rewrites, meta tags and titles etc but it’s not as easy to use as it is with WordPress.
There are general options that apply to the full site. Also, options that you can apply per article/page from the editor’s options section. Beginners will struggle here. They will find it overly complicated to implement SEO for their Joomla website.
Plugins are also available to will help with SEO. However, although they provide you with additional options to use, they still interface with the current editor’s options interface which in itself is clunky to use and not very user-friendly.
In comparison, Joomla is not considered to be as SEO friendly as WordPress.
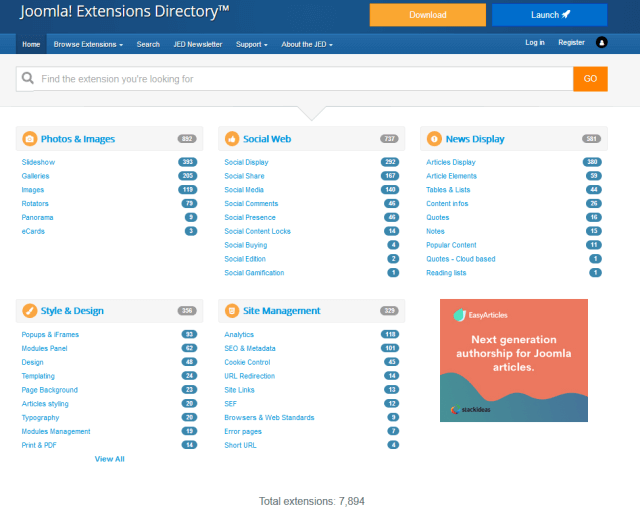
As with all CMS’s you can use plugins to enhance the functionality of your site. Joomla is no exception here. There is a portal that currently contains 7, 894 extensions [https://extensions.joomla.org/]. This is pale in comparison to WordPress which has over 50K plugins!
These extensions are a combination of components, modules and plugins for various types of features your site may need. Although the layout of the extension portal is better than its counterparts. The actual directory does contain extensions which are version dependent.
What that means is that an extension that works on an older version of Joomla is unlikely to work on a newer version. The extensions are also clumped together. Free and paid versions both displayed side by side. A huge chunk of which are paid extensions.
From a performance point of view, Joomla was built by its developers to be fast. Its code is built on a lightweight PHP framework and optimised for load times. It also has a built-in cache and compression tools, unlike WordPress.
Again, you can further enhance these capabilities with specific extensions. Generally, the built-in options actually do a good job. You would be better off following best practices like using HTTPS, optimising images etc. This would have a better impact on your page load times.
Joomla also provides you with decent security. It has a dedicated Security Strike Team. They always strive to be ahead of the curve and have a reputation for releasing patches before exploits are widely known in the wild.
Security options are definitely more complex than WordPress. Providing you with options to set permission for different types of users, files and server permissions. All built-in and controlled by the admin panel.
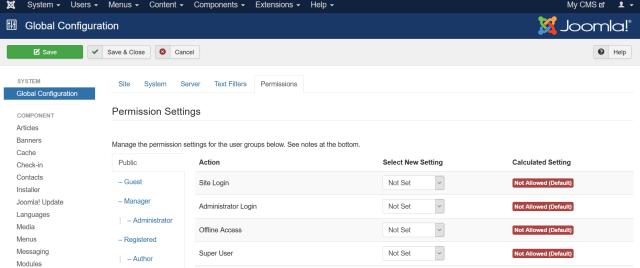
The one downside is that there is no automation of security patches. You have to apply them manually by initiating an update via the admin area.
Where Joomla actually shines is the fact that it has built-in multilingual support. Over 70 translation packs are available for the core. Plus out of the box support for multilingual content management and language associations.
It also shines in how it will display non-standard content in custom layouts and designs. Compared to WordPress, it’s extremely flexible and fluid in its ability to display different types of content.
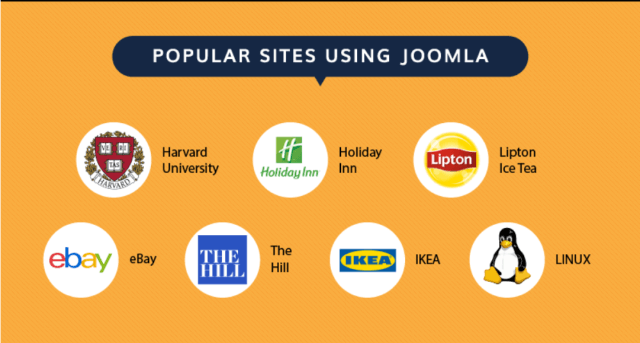
Its used by some notable websites [source: https://www.mobiusmbl.com.au/client-support/who-uses-joomla]. Websites like the NCA (UK National Crime Agency), the High Court of Australia [http://www.hcourt.gov.au/] & The Eiffel Tower to name a few. As with WordPress, you’re in good hands here:
Last but not least, what does it cost to run a Joomla website? Well, the costs are like that of WordPress. Even though the platform is opensource and free to use you may end up requiring the use of themes and plugins.
Typically, you will end up paying for these premium themes and plugins more than you would with WordPress. This is due to the lack of large free offerings. Yet, the costs are like WordPress, starting from $40 upwards.
The biggest difference is the cost of any freelance developers that you may need to hire. Developing Joomla is a much more niche market compared to WordPress. You can use the same market places like UpWork and Freelancer.com but the costs are slightly higher. This is due to the demand of Joomla developers and lack of them in the market place.
Pros
- Opensource – Free to Download and use.
- Fast core code on a lightweight PHP framework.
- Plenty of support available.
- Better user management.
- Flexibility in displaying non-standard content.
- Built-in multilingual support.
Cons
- Not very SEO friendly.
- HTML/CSS knowledge will be required.
- Extensions are hard to find and harder to maintain.
- NO official template/theme repository.
- Slightly Complex making it difficult to incorporate your own custom design.
- Higher cost to hire developers for custom work.
Overall Joomla isn’t a good option for a beginner. It does need much more time and planning to be able to deploy a Joomla website you will be happy with. Coupled with the fact you will need some intermediate coding skills it’s not suitable for beginners. It is, however, a good option for those that are technically competent.
Finally, like with WordPress, there is also a hosted option available. The plans are not as clear and fully featured as WordPress. They seem to be very simple which can be looked at as advantageous. You can also use your own domain, but it will cost you, a low fee of $15 p/m. However, the Joomla hosted option is not something that we will be recommending.
3. Drupal Although this is the second most popular CMS used, we included it last.
It’s a CMS for advanced users and enterprise type websites. On average Drupal gets downloaded over 1.2 million times a week. Although version 8 has been out for some time version 7 still seems like a popular choice to download.
As with the other 2 CMS’s The Drupal project is also open source software. Anyone can download, use, work on, and share it with others.
Need help? you can rely on the Drupal community. It’s one of the largest open source communities in the world. There is more than 1,000,000 passionate developers, designers, trainers, strategists, coordinators, editors, and sponsors working together to provide support and much more for the Drupal platform.
Looking at Drupal it’s definitely geared towards advanced users. It isn’t for beginners. You will need a working knowledge of PHP/HTML/CSS to make site changes and to get the most benefit out of this CMS.
The interface of Drupal is more complicated than the other 2 CMS’s. There have been attempts to simplify this over years and whilst it has improved, there is still some way to go.
Installing and setting up Drupal is very similar to the previously discussed CMS’s. The one major difference between Drupal and the other 2 CMS is you can install ‘distributions’. Essentially these are packages which include pre-installed modules and extensions.
You will, however, need some technical expertise to set up and install Drupal. You do get an install script but it does need more effort and technical competence compared to the other CMS’s.
How about themes/templates? Well, Drupal has a dedicated section on its site for themes where it has over 2,780 free themes. You can use the search functions to narrow down on your specific requirements which is an added bonus. The theme information is also pretty extensive compared to the other 2 options.
There are quite a few themes based on the bootstrap framework. So you’re essentially guaranteed a mobile-friendly website out of the box.
The only downside is that the theme section on Drupal’s website isn’t presented clearly. It can be confusing to use. It’s simply not laid out in a user-friendly way.
There are plenty of free themes you can add to Drupal. But its focus as a platform is more on allowing you to make direct code edits to its template files. This allows you to customise your site directly.
Drupal is absolutely perfect for a developer. A developer will be able to customise every aspect of the website to their heart’s content. Not so much for a beginner who will find it difficult to design, create and deploy a custom site.
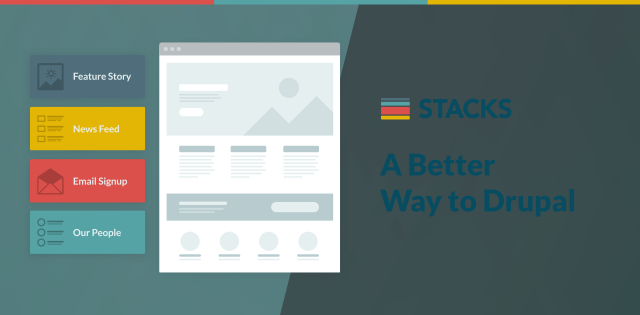
Like the other Joomla and WordPress, Drupal also has premium page builders if you need to use one. You can get the stacks module direct from Drupal which is a pretty awesome page builder and it’s free:
If you’re moving over from WordPress and you’re used to the say the Gutenberg editor, then this page builder is also available as a module for you to use with Drupal. Other editors like Elementor are also available should you wish to use them.
Drupal has the standard built-in SEO functionality of any CMS. It does play pretty well with search engines. The Drupal CMS gives you the ability to control all the elements of a web page. You do this with the help of pre-installed automation tools for SEO.
It has SEO friendly URLs as part of its core. You can also set SEO friendly URLs on a manual basis with built-in functionality. Using an extra module like Pathauto you can automate this based upon the content that’s being added i.e. use the title of the page (like WordPress does).
Further enhancing the SEO capabilities is as easy as adding in a module. The popular Drupal SEO Tools module will provide you with all the extra advanced SEO functionality that you could end up needing. It’s not as easy to use and setup as is with WordPress SEO plugins but its comparable in the code output.
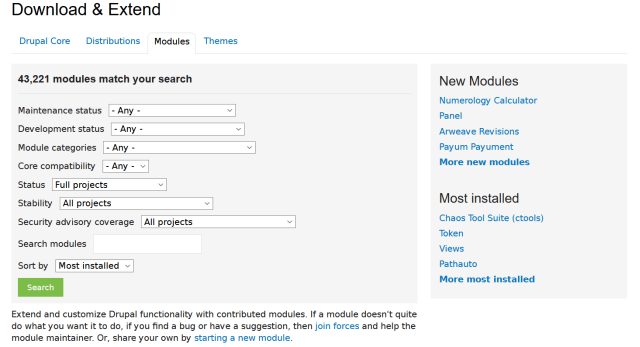
Similarly, with other CMS’s Drupal has over 40,000 modules to enhance its core functionality. This is significantly more than Joomla and only a little less than WordPress. SO, you’re in good hands here.
One major advantage that the Drupal modules have is that they all play well together due to Drupal’s strict coding standards. This isn’t the case for WordPress/Joomla modules so Drupal is a clear winner here.
Performance wise Drupal is excellent. It’s not as intensive on the server as with other CMS’s. As long as Drupal is configured correctly it can handle thousands of simultaneous visitors at a time.
Drupal is not as demanding on the server in comparison to competitors. You get the ability to create a fast loading website which can be extremely scalable. It is a truly enterprise CMS solution. On the security front, Drupal ticks all the boxes here too. It’s a very safe CMS to use, granted it has had some big issues in the past, it has now moved past those. Security patches are provided very quickly in the event an issue is found.
You will need to manually apply them like with Joomla, via the automated updater. Go to the admin area to update your install and apply any official patches that are released by Drupal.
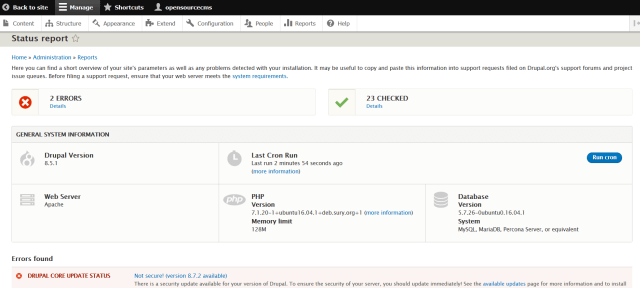
Additionally, built-in reporting will show you the health of the site. It will also show anything else that requires your immediate attention.
Drupal truly shines as an enterprise CMS solution. It will allow you to deploy a highly customised website that’s truly scalable. With no limits and all the advanced features, you would expect from an open source enterprise CMS.
No wonder Drupal is the platform of choice for big websites like the United States Whitehouse [http://www.whitehouse.gov/] and Amnesty International.

It’s also the CMS of choice for big media companies like the BBC, NBC, and MTV UK.
Cost wise, the Drupal platform is opensource and free to use. Any premium themes and extensions have a similar cost to WordPress and Joomla.
The biggest cost difference is when it comes to customisation. You will not be able to simply rely upon themes/plugins to create and design your site.
You will need a skilled developer at some stage to design and deploy your site. The cost of which is more than double in comparison to that of a WordPress or Joomla developer. It requires a higher skill set and level of experience than compared to the other 2 platforms.
Pros
- Opensource – Free to Download and use.
- Highly scalable and customisable.
- Developer-Friendly.
- Strong security features.
- Excellent at displaying non-standard content.
- Built-in multilingual support.
Cons
- Not beginner friendly. Very complex to use.
- Requires developer skills OR hiring of an experienced developer.
- Major updates and versions can be difficult to install.
- A huge learning curve to use Drupal effectively.
- Documentation is difficult to understand and isn’t that good.
- Does not commit to backward compatibility across major revisions.
Overall Drupal is an excellent option if you’re looking for a scalable and customisable site. It’s definitely not a recommended CMS for beginners. You do need to be a developer or at the very least hire an experienced developer to get a site that you will be happy with.
Unlike the other 2 CMS’s Drupal doesn’t have a hosted offering. You will have to download and install the CMS or use your web hosting 1-click installer to get you started.
In summary, if you are looking for a beginner friendly CMS that is
- SEO friendly.
- Has plenty of support.
- Free professional themes.
- Plenty of feature-rich plugins.
- used to build professional websites
recommendation: We definitely recomend WordPress
You won’t need any coding skills. It will handle multiple visitors and large amounts of traffic easily. As well as being perfect for beginners to get started quickly.
But. If you’re looking for something that’s a little more flexible, provides you with more functionality and control then Joomla may be your CMS of choice.
However, if you’re choosing Joomla you will likely have some coding skills. If that’s the case, then ditch Joomla and jump straight into Drupal.
Drupal is a long-term option. It’s highly customizable. It includes all the core functionality you will need (which of course can be upgraded via modules). You can also build an enterprise-based site which is also multilingual ready out of the box.
Step 2: Choosing a Domain name and getting Web Hosting
In the read me section right at the beginning of this guide we said
The only assumption is that you already have a domain name registered and have your unlimited web hosting plan ready to go.
If you have got your domain and your hosting then you can skip to Step 3: Setting up your website.
If you haven’t and you’re scratching your head asking what’s he waffling on about? Or why I would need a domain or web hosting I’ll just use the free options out there, then read on.
First. Pretty much every website on the internet works by having a domain name and web hosting. Without which you cannot have a website. Let’s help you understand the importance with a few examples!
Essentially, it’s the location where the postman will deliver your mail. Without a specific location, your mail won’t arrive. It’s the same with your domain without which no one will know where your website lives.
Then think of web hosting as your house. Just like your house contains all your contents your web hosting will contain all the contents and structure of your website. If you don’t have any content then all your visitors will see is an empty site aka a blank white page!
So now that’s cleared up let’s get cracking. Let’s help you get a domain name and the best possible web hosting. We’re going to recommend the best options for your new website. You don’t have to use us but we would love it if you did 😊
Tip: Our recommendations will help your website perform better in the search engines. You don’t want a dead website that no want visits!
Should I use a free domain & web hosting provider?
Even though you can get a free domain with certain providers it’s going to be something on the lines of mybusiness.free-website-provider.com. That isn’t professional at all. You will want your own domain to have a dedicated web address e.g. yourwebsite.com (more below).
Also, you want your own web hosting. Free website providers don’t allow you to access your website files. It’s like renting a house, you never own it. Having your own web hosting means you will be the master of your own website. Plus you will own a little piece of the internet world!
1. Choosing a domain name for your website
Firstly, you need to get yourself a domain name. This will be your web address on the internet. You can get this from the same place as you will get your web hosting. But we generally recommend that it’s separated from your web hosting provider.
Keeping your domain separate from your web hosting will prevent any future issues that may occur with rogue providers.
Domain registration prices are cheap. You can get a domain for as little as 10 quid (or bucks if you reading this in the US of A). Changing where your domain points to is very easy to do.
Here are some practical tips on getting the right domain name:
- Keep it memorable. You don’t want something like domainnameformynewwebsite.com. I mean who’s going to remember that OR more importantly type it out correctly?
- Keep it in line with your brand. A brandable domain name is a very good option for a long-term business. Look at all the big businesses in the world Google, Argos, ASOS, BaseCamp, Wiggle are all good brand names.
- Don’t be spammy. Many people think getting a domain with all your keywords in is going to help with your SEO/marketing. Actually, that’s not true anymore. Whilst it used to work wonders years ago it can actually hurt your website more than it helps. SO, don’t get something like debtrecoveryagentsmanchester.com
- Choose the right TLD. A .com targets the whole world. It’s top-level whereas .co.uk will focus on the UK market. .org will represent an organisation. Choosing the right type of TLD sends the right signals to the search engines. It tells them what your website is about. Yes, newer TLD’s have emerged like .london .online .app. These are good for established brands and businesses but not recommended for beginners.
The takeaway here is to register a domain name that is memorable and represents your brand. Try and keep it short, sweet and relevant to the service or product you offer BUT don’t get spammy.
2. Getting a web hosting account
The second step is to get your web hosting account. The internet is awash with hosting companies. You’re inundated with offers daily. Which although can be very appealing are often not the best option for your website.
The type of web hosting you choose will have a direct effect on the visitor’s coming to your site. If your web site is up and down a like a yoyo or pages load really slow then this will put off visitors who expect a fast loading site.
This will also have a knock-on effect with the search engines especially Google. In its search algorithm, it has 1 signal (amongst its 200+) dedicated to looking at how fast your website is.
There are many things you need to consider when choosing a web hosting provider some of which are:
- What kind of budget do you have? This can have a direct impact on the quality and type of web hosting you can buy i.e. shared, dedicated, VPS etc.
- Is performance important? As discussed before a web hosting account that only works for half the time aren’t the best option. Some visitors will see your site and others won’t!
- What kind of support is provided? Is it from the sales staff? Or knowledgeable technical experts? In the event that you need help and support, you want to be able to get help from tech guys who can resolve your problem very quickly.
- Do you get free SSL certificates? This really is a no brainer. Hosts that don’t offer Free SSL’s should be avoided. It’s free to get SSL certificates. Lets Encrypt integrates directly with web hosting platforms and provides them free.
- The location/country of your hosting server. If your visitors are going to be from the UK then you want a hosting server located in the UK. If its US then one located in the US. The further away your users are from the location of the server the more it impacts the time it takes for a site to load.
- Is it easy to use? Seems like a simple question to ask but many providers control panels are overly complicated. Getting to the right section to install a service OR to simply access your files can often take 15-20 mins. It should be fluid and easy to use!
One key question that is often missed out is: who actually owns the web hosting company? It’s rarely talked about but it can have a huge impact on the quality of service you get.
Often you will find people hopping around from one provider to another. They never realise that they are all owned by the same company, hence the bad service. It gives all the companies a bad name.
Some of the most popular web hosting companies which have some fantastic deals are often the worst service providers in the industry.
They have loads of reviews that mask their bad service. They are quite often highly recommended by many people and websites. Why would someone recommend a bad service you ask? Simply put, for commissions. Certain companies pay up to £/$75 in commissions per signup regardless of how bad their service may be!
Actually, the question to ask is which company should you be staying away from! It’s a company called EIG. It owns several huge web hosting brands, some of which you will have undoubtedly come across.
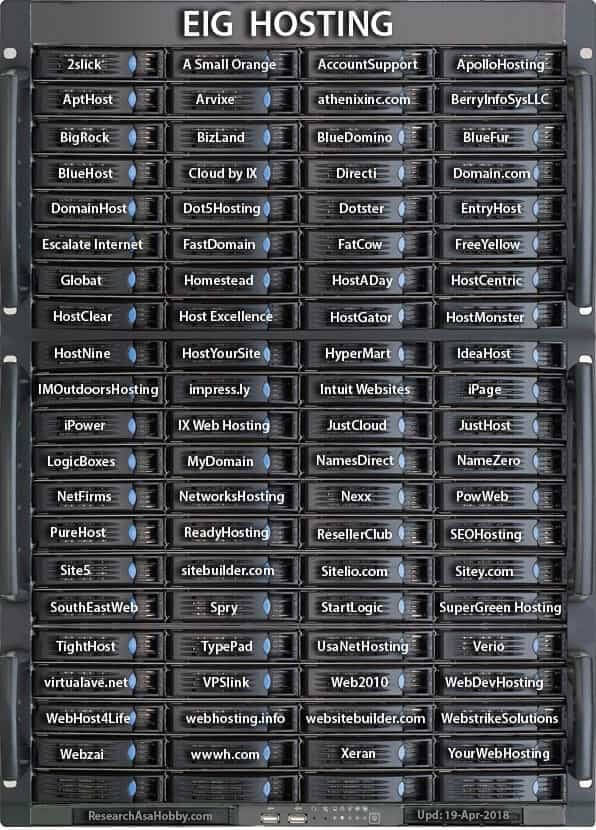
Have a look at the official Wikipedia page to find out the businesses EIG has purchased & owns. Visit this website for an up to date list and in-depth cutthroat review.
There is plenty of information about why this is a shocking company to be doing business with. But to put it simply:
In very short, the main reason is that EIG has a very bad reputation of ruining the hosts it acquires. HostGator, Arvixe, A Small Orange, Site5 and so on – we all have heard a huge mass of horrible stories from former clients of these hosts which sharply deteriorated their services after being bought by EIG. EIG “optimizes” cost structure of the hosts it buys out, fires great (expensive) support staff and migrate clients to worse hardware infrastructure.
On its list, you’re going to find some very well-known brands. So, save yourself the trouble. They may have good deals but they are simply not worth risking your new online venture over.
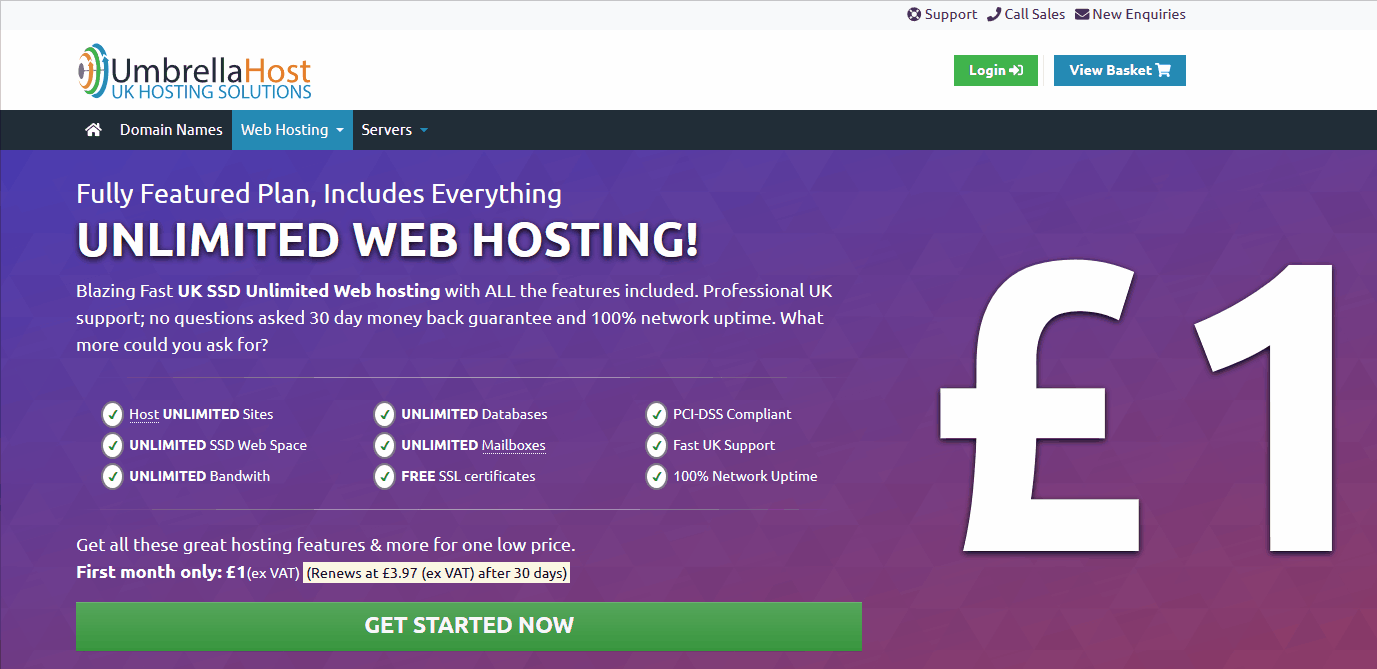
So which hosting provider should you use? Well although we are an independent web hosting provider who can provide you with WordPress Hosting OR Unlimited Web Hosting. We are not going to demand that you signup with us. Nope!
Our recommendation is to find a good independent hosting provider. You will get the kind of customer service, technical expertise and of course quality web hosting that your website deserves. All at cost-effective prices.
IF that happens to be us, then Welcome onboard 😊 Click here to follow these steps to signup.
Our most popular plan is the Unlimited Plan. This gives you everything you need. Unlimited web space, bandwidth, free SSL certificates and a 1-click installation of WordPress. All for £3.49 p/m
You get the first month for £1 and it also comes with a 30-day no questions asked money back guarantee. You have absolutely nothing to lose.
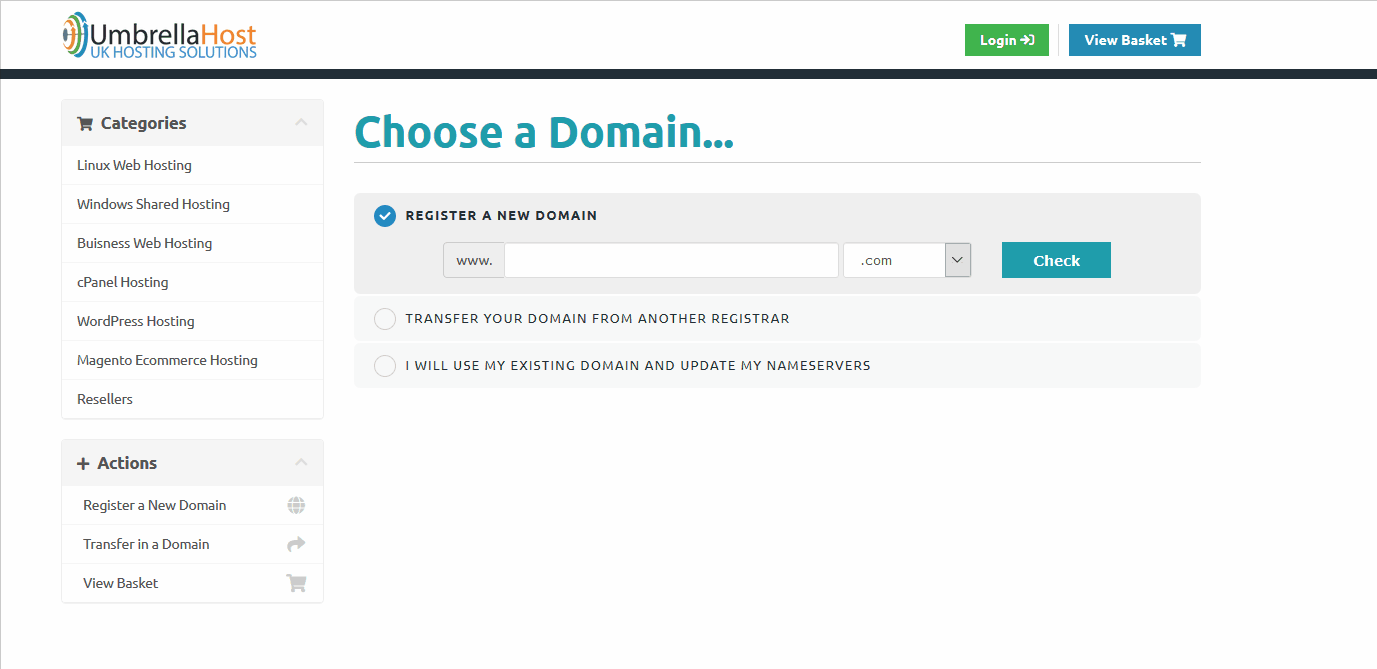
1. Sign up for the unlimited plan by clicking on the Get Started button

2. Register your domain name
As we indicated earlier, keep it simple, short and relevant to your business. A good example would be:
- For your business: yourbusinessname.com
- Your personal name: yourname.com
Remember: try and use a .com .co.uk or .net extensions. Even though there are many other extensions available like .london, .online these are likely not going to be suitable for you unless they are highly relevant.
If for example, you have a TV channel then a .tv extension will be perfect otherwise try and stick with a .com extension!
Type your business name into the box and hit check. That will show you if it is available or not:
If you already have your domain name then you should choose the ‘I will use my existing domain name’ option. This will associate it with your new web hosting account:
3. Check your plan details, fill out your information and complete checkout
All you need to do now is ensure you are signing up to the right plan for your website. If you’re happy then click the continue button to review your order. In the next step, you will automatically have the £1 for first-month offer applied. Nothing extra for you to do 😊
After that, you will be asked to enter your details i.e. name, billing address and email. These will be used to set up your account and send a receipt to the email address you entered. Choose your secure password and enter in your payment details to complete your order.
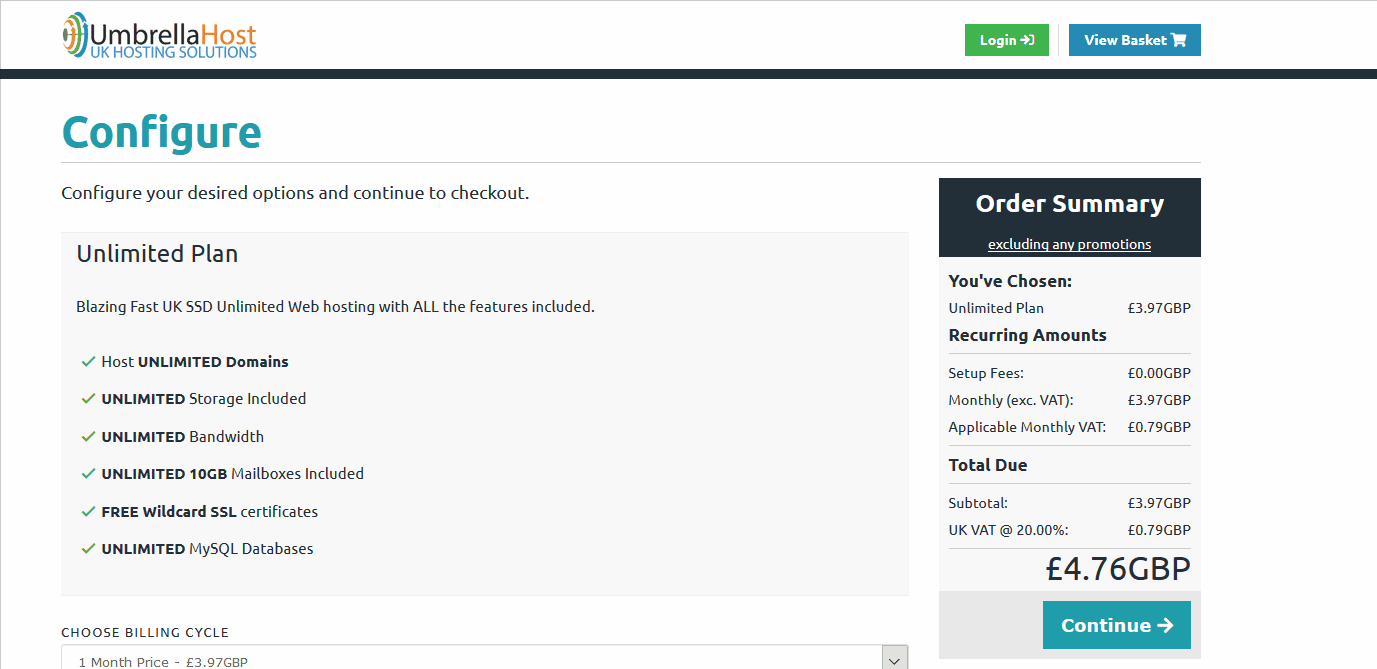
All your details are processed in a safe, secure environment and protected during this entire process.
Step 3: Setting up your website
Congratulations your half way there in creating your free website. That was a bit of a mammoth read. If you have followed everything so far, then your choices will allow you to choose and set up the website with the right options.
Now we are going to set up WordPress (our recommended option) on your web hosting account for your domain.
You have 2 ways of doing this. The first is automatically via the hosting account and the other is manual.
1. Installing WordPress via 1-Click Installer
The quickest and easiest way is to use the 1-click installer from your web hosting package. This will add all the files, connect it to the database & install WordPress.
Follow these steps to get going:
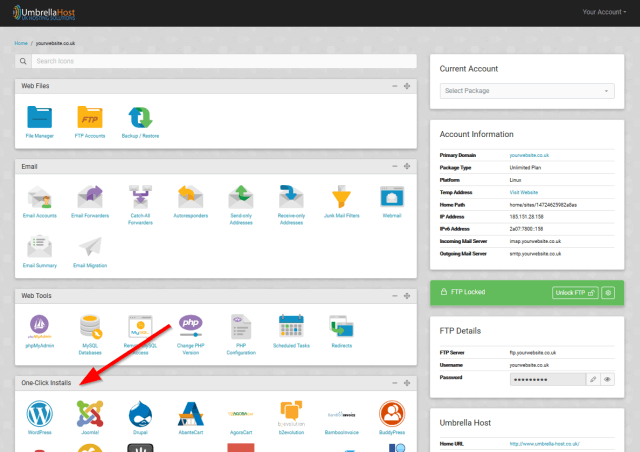
- Login to your hosting account control panel.
- Navigate to the 1-Click Installs section.
- Click on the ‘W’ WordPress icon.
- Select a location to install WordPress too (Tip: choose the default area).
- Hit the Install WordPress button to begin the install process.
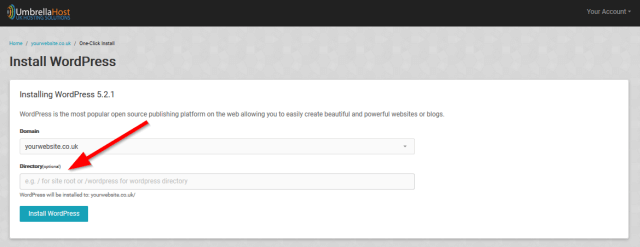
The 1-click installer will now take all the steps required to install WordPress for you. No need to set up a database, upload files etc. You will be prompted to select a few options during the install. After which you can log in to your new WordPress admin area to customise your site as you need.
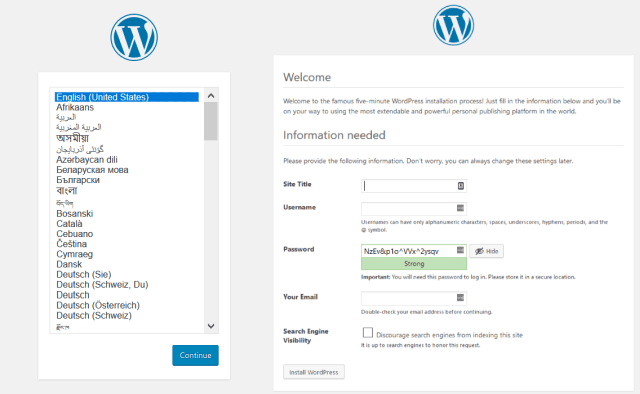
Choose the options that best reflect your new website. Don’t worry you can change all these later via the admin area.
Pro Tip: remember your username & password. You will need these to log in to your new WordPress site.
Once you have chosen those hit the Install WordPress button.
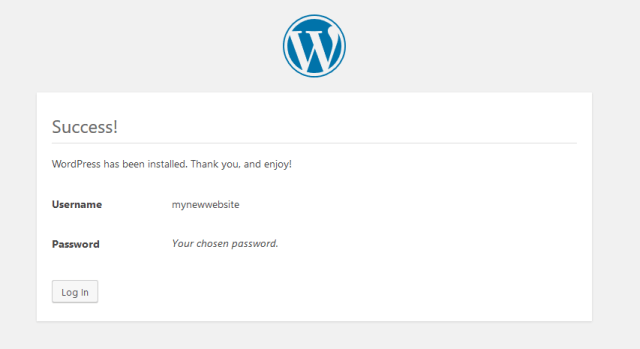
That’s it, all done! Your new WordPress website has been installed and ready for you to use.
2. Manual WordPress Installation
(where you don’t have the 1-click option OR want to customise the install)
Why would you want to manually install WordPress? Well, if you have already purchased your web hosting, sometimes you don’t have the option to install WordPress in 1-click. This doesn’t necessarily mean that the web host is bad (but it’s not a good sign either).
OR the most common reason is you want control over the full install process. Some of the following reasons for doing so are:
- To specify a custom content & plugin directory.
- Choosing your own database details (username/password).
- Change the
SALTS(security hashes used when you log in). - Other advanced custom edits.
Follow these steps to install WordPress manually
Steps to manually install WordPress
- You’re going to need an FTP client (used to send files to your web hosting account) for you to follow steps outlined below and later. If you haven’t already got one, we recommend FileZilla. Pop over here to download it. Then proceed to install it like any other Windows/Linux application.
- The second thing you are going to need is a copy of WordPress. Before you download it, create a folder on your PC. You can name this whatever you like.
- Hop over to https://en-gb.wordpress.org/download/ and download it. Then unzip/extract the files to the folder you created earlier. Tip: You can download this in various formats (.zip is the easiest).
- Login to your hosting account and create a database. A user with full privileges for the database and a secure password. Your web hosting provider can help you here if you run into problems. Copy the database name, username and password, you will need these for the next steps.
- Locate the wp-config-sample.php file in the folder you created and extracted WordPress to earlier. Copy OR rename it to a file named: wp-config.php
- Now open that file in your favourite editor (Tip: use Notepad++ it’s a great tool to use OR you can use the standard notepad app). We are going to make some edits in this file. Replace the parts in
‘red’with the details from step 4 above.define(‘DB_NAME’, ‘database_name_here’);define(‘DB_USER’, ‘username_here’);define(‘DB_PASSWORD’, ‘password_here’);
- Then around line 45, you will find the security salts. These can be changed using an online tool here: https://api.wordpress.org/secret-key/1.1/salt/
- Hackers who plan to attack your site do so by targeting the default wp_ prefix table. Thankfully you can change this to whatever you like. But. it does need to be letters and numbers only. Like: wp76hst65_. Around line 66 look for this setting and replace the parts in red with your preferred replacement:
$table_prefix = 'wp_';
- Now we can make some advanced edits that will help you out later on. This will stop your website from running into potential problems in the future! You may as well make those changes now. All the following additions should be added before the line that says ‘That’s all, stop editing! Happy blogging.’
define('WP_MEMORY_LIMIT', '64M');– WordPress can at times be resource intensive. A single site has the default 40MB setting. Sometimes you need a higher memory limit. Although changing it to a 64M value is enough you can also replace this value with either: 96M, 128M, 256M too.define('DISABLE_WP_CRON', 'true');– WordPress uses the wp-cron.php file to automate things. Like scheduling posts, saving post revisions and much more. This default behaviour can be intensive and we can disable it and use a plugin instead (more below).define( 'WP_HOME', '/WORDPRESS_FOLDER NAME/' ); if ( !defined('ABSPATH') ) define('ABSPATH', dirname(__FILE__) . '/WORDPRESS_FOLDER NAME/');This is used to install the core WordPress files in a different directory providing a little more security. Don’t worry it will still allow you to automatically update your install. Remember: replace WORDPRESS_FOLDER_NAME with your chosen folder name i.e. wordpress., core etc.define('WP_CONTENT_DIR', dirname( __FILE__ ) . '/CONTENT_FOLDER_NAME'); define('WP_CONTENT_URL', '/CONTENT_FOLDER_NAME' );Again for security this wills separate out your theme files from WordPress core files. Remember: Replace CONTENT_FOLDER_NAME with your own preferred folder name i.e. app, theme etc.define('UPLOADS', 'UPLOADS_FOLDER_NAME' );Like above. This allows you to have a separate directory folder. Remember: replace UPLOADS_FOLDERNAME with your own folder name.define('WP_PLUGIN_URL', 'PLUGIN_FOLDER_NAME' );As before it separates out your plugins into its own unique directory. Remember: Replace PLUGIN_FOLDER_NAME with your chosen folder name i.e add-ons, extensions etc.
What you are doing with the advanced edits is to secure your installation from potential attacks in the future. It’s better to take preventative measures beforehand rather than to be addressing a hack that’s already happened. You will thank yourself later!
If your feeling a little overwhelmed with these edits. If you cannot wrap your head around them. You can use this online generator which essentially does the same thing 😊. It also has many more advanced functions you can use, if you want.
The last thing to remember. With the advanced edits, you take above. You will need to create the folders in your web hosting with the names you choose above beforehand.
- Fire up your FTP programme (FileZilla in our case) and connect to your hosting using your FTP details which are available via your welcome email OR hosting dashboard.
- Navigate to the
Public_html /root folder.- Remove any existing index(PHP/HTML) files and folders. Tip: Take a backup just in case!
- Create the 4 folders with the names you choose in the above steps.
- Upload the WordPress files as follows (to the folders you created above):
- The index.php, .htaccess and wp-config.php file (which you edited) to the
public_html /root of the site. - Then upload the wp-admin and wp-includes folder to (9 c) WORDPRESS_FOLDER_NAME (remember your folder name choice you created).
- Upload the wp-content folder excluding the plugins folder contained within to CONTENT_FOLDER NAME (remember your folder name choice you created).
- Upload the plugin folder which is in the wp-content folder (see above step) to the PLUGIN_FOLDER_NAME (remember your folder name choice you created).
- The index.php, .htaccess and wp-config.php file (which you edited) to the
Visit your new website. It should redirect you to the same screen if you were installing automatically:
Fill out all your details the same as outlined earlier and you will be good to go!
Step 4: Designing your new website
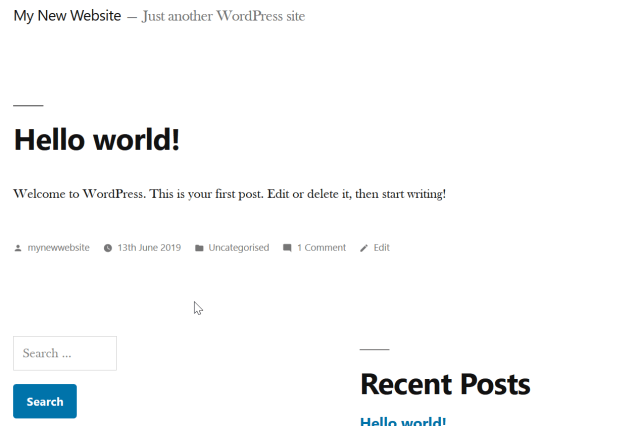
Now that you have installed WordPress you will find that your website has the default WordPress theme applied (for whichever year it is, Twenty Nineteen in our case).
The front end of the website definitely doesn’t look like a professional site at all. In fact, it’s very remonstrant of a personal blog type layout. It’s very basic and will need you to customise it. The settings will need updating. Content and sections will need to be added via the admin area before it starts to resemble a site you’re going to be happy with:
You have a couple of options here to get your website looking more professional than it currently is:
- You can customise the default theme that was installed during the setup.
- Choose a different theme from the WordPress repository.
- Buy a premium theme form a marketplace like ThemeForest.
By far the easiest choice here for a beginner is to use a free theme from the WordPress repo. It’s very easy to search for and add in a new theme via your WordPress admin.
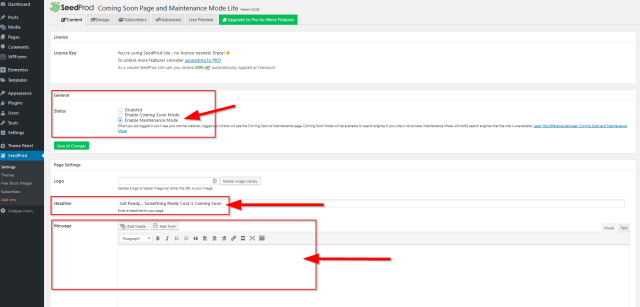
Pro tip: Before you go about designing your new website, testing themes and settings. We highly recommend that you install a WordPress maintenance plugin. In our plugin section below, we give you our recommended go to plugin to use. All the steps you need to take to install plugins on your new WordPress site.
If you don’t want to skip the following sections but still want to take advantage of adding a maintenance plugin. Follow these quick steps:.
- Go to WordPress dashboard
- In the left sidebar look for ‘Plugins’ and select > ‘add new’
- Search for ‘Coming soon SeedProd’
- Click the install button followed by ‘activate’ button.
- When you click ‘activate’ it will redirect you to the plugins options page.
- Select maintenance mode – this will stop all visitors and search engines seeing your site.
- Fill out all the other sections as required.
Adding in a maintenance plugin is going to ensure you can work on your website in peace. You won’t put off any potential visitors who may visit the site during your design phase. Ensuring that you don’t show them an unsightly or worse, a website filled with dummy content!
It also stops the search engines from indexing your website with this dummy filled content. After all, you don’t want them to show your site as being about ‘lorem ipsum’?!
1. Installing a free WordPress theme
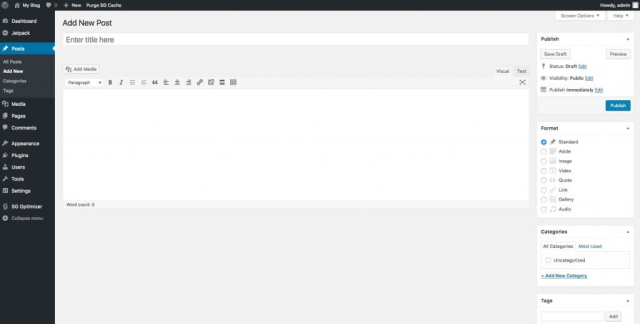
Go to your WordPress dashboard. In the left sidebar search under the ‘label’ Appearance’ for ‘Themes’. Click on that link to be taken to the themes page.
There you will find access to well over 2000+ free themes to choose from. You can customise and apply to your website and make it unique.
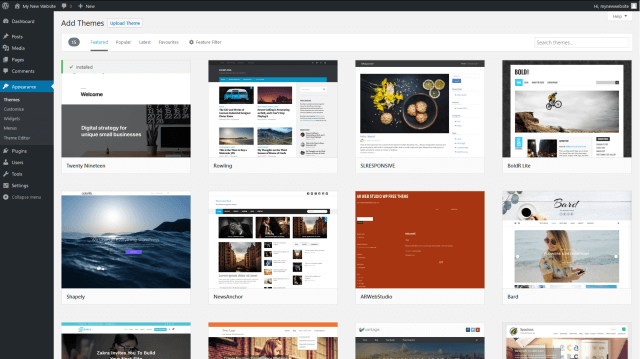
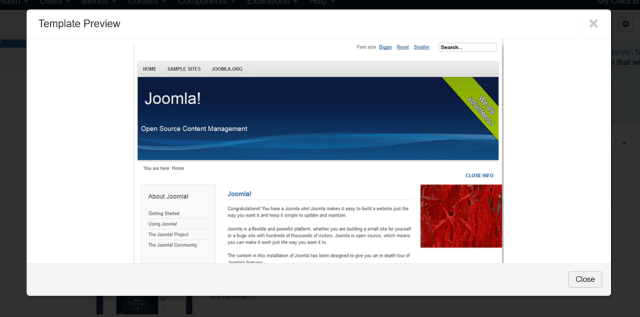
You can preview any of these themes before applying it your site by clicking on the image. It will show you what your website could potentially look like. The only disadvantage here is that you may not see a full preview like that of the preview image. This may be due to your website not having any existing content etc.
Sometimes these themes do have demos with dummy content so you can see what a finished could end up looking like but they are not always easy to find.
If you’re still not happy with the selection of free themes available then you can buy a premium theme form a market place like ThemeForest [INSERT LINK: https://themeforest.net/ ]. Themes from market places usually cost around $40 but can vary all the way up to $100.
Before you do that, you should get familiar with searching for themes via the theme section. Use keywords or terms related to your business or industry to see what is available.
Then we recommend that you read the next section as we have done the hard work for you.

2. Choosing a good WordPress theme
Before you install a new theme, make sure you cover all your bases. Remember. Although you want a good-looking design which is easy for you to manage, it’s also important that your theme is coded efficiently. That it’s also mobile and SEO friendly.
Although the free themes available are responsive (mobile friendly), many of them are coded poorly. This can have a negative impact later on down the line with regards to your overall SEO.
Fear not! We have done the hard work for you. Out of all the free themes available on the WordPress repo, 3 have stood out as being the best there is. Each has the following positive aspects:
- Responsive / Mobile friendly
- Clean lightweight efficient code
- Built for fast page loads
- Excellent for SEO
- Beginner & developer friendly
- Easy to customise
i. OceanWP Theme
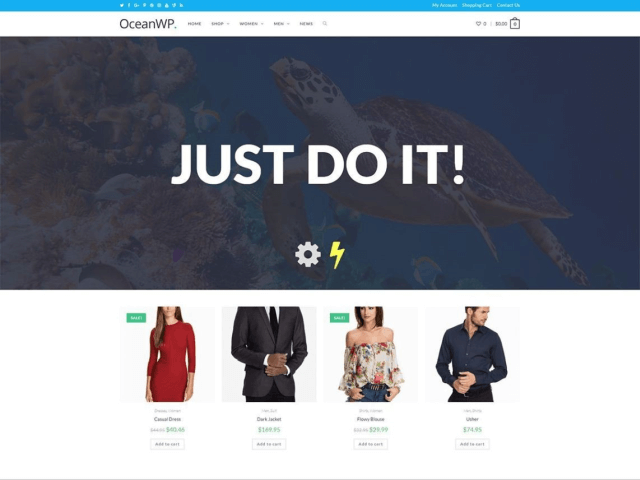
This is a super lightweight base theme which can be customised to suit any type of industry and business. Its lightweight code means fast page load times. Its optimised code will also satisfy SEO requirements.
The theme includes pre-built demos. This includes dummy content. You can import into your website at the click of a button. This allows you to quickly build a professional looking website with all your own information.
It is compatible with all the popular page builders. You can essentially create any type of website easily using the drag and drop features from the page builder.
Furthermore, it’s fully compatible with WooCommerce. This will allow you to set up an ecommerce store to sell products from. Not only is it compatible but it also has integrated native features.
That means you don’t have to use a range of extra plugins to get advanced theme functionality.
If your still not satisfied then there is a premium offering. That will give you 60+ pro demos and additional functionality on top of the standard functions that are available for a low price of $39.
Lastly, an added bonus of this theme is that not only is it beginner friendly but its also developer friendly. A developer can easily jump into the theme’s code and extend or change it to suit the requirements of a custom website.
This will truly allow you to create a unique bespoke website like no other!
ii. Astra Theme
This is a super sleek free theme. It focusses on creating a website based on a lightweight framework for fast page loads. One of the ways it does this is by ditching the reliance on jQuery (intensive JavaScript). It uses a lightweight option instead.
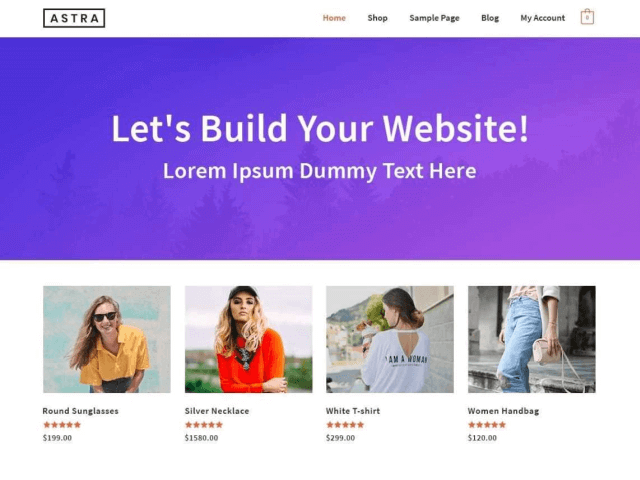
Astra is built with SEO in mind. It comes with Schema.org code integrated and is native AMP ready so search engines will love your site. It’s very easy to customise the site too. It integrates with all the popular page builders like Beaver Builder, Elementor and many more to make creating a unique website a breeze.
It’s also WooCommerce ready. This will allow you to quickly integrate ecommerce features into your new website. You could be selling products right from your own site in no time.
The icing on the cake with this theme is that you can import pixel perfect pre-built demos. They also include dummy content, which imports directly into your site. That going to cut your design time down by more than a half.
If you’re not happy with the selection of starter demos included then they have a premium offering. Thi not only gives you access to premium demo sites to import but also extra add-ons. They further enhance the standard Astra theme options, all for $59.
iii. GeneratePress Theme
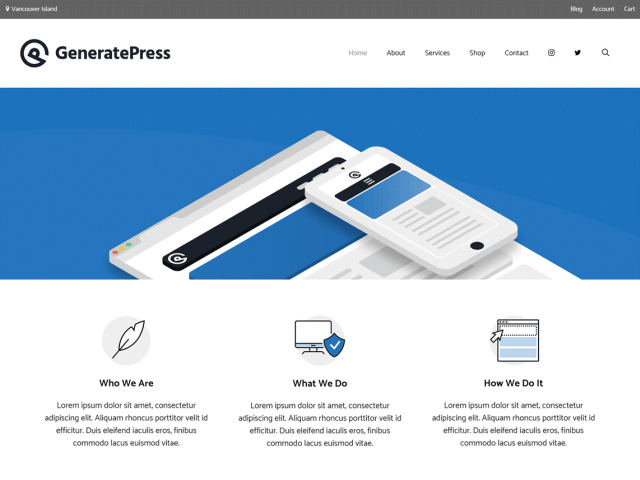
This is one of the fastest if not the fastest WordPress theme available. Again this one is also built for speed using a lightweight framework. It doesn’t depend on JavaScript (that’s looking at you jQuery). It’s accessibility-ready. The HTML code also includes schema.org structured data for optimal SEO performance.
It’s pretty easy to customise the site too via the site options and the built-in customizer. It does rely on the new native WordPress page builder: Gutenberg which allows you add in elements on the fly.

The only disadvantage we can see is that you don’t get pre-built demos which you can import in the free version. There is however a premium option. This includes the ability to import pre-built demos but also extra functionality. You can truly make your website ultra-unique.
recommendation: Our recommendation is the OceanWP Theme
We found that it has a slight edge over the other themes. Its standard demos are a little more professional. They are better looking than the others and it’s generally easier to design your site.
It uses the built-in WordPress customizer to make changes to various aspects of the theme. Making it super simple to use. Plus, you’re not tied down to a 3rd party page builder either. Which although can be a huge help, can at times add bloated code to the frontend of your website. That can have a knock-on effect for your page speed and SEO scores.
But, you don’t have to use our recommended theme. Each of the 3 themes is more than suitable for a beginner to use.
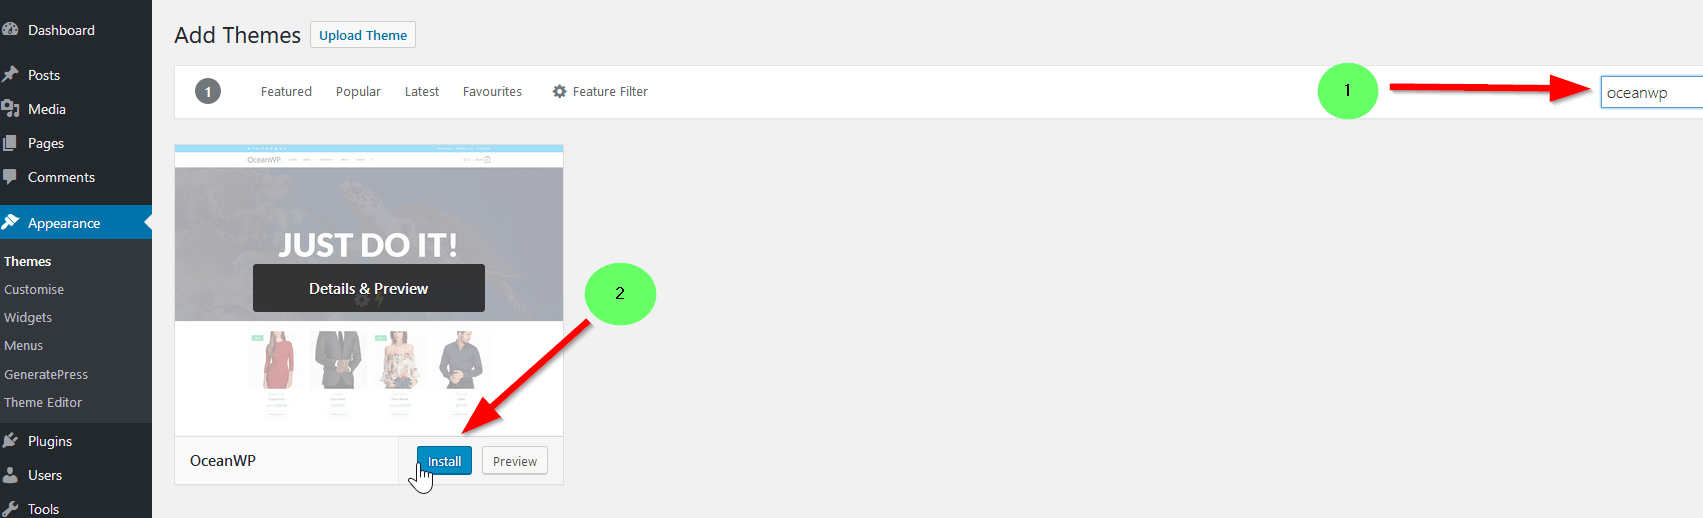
To get started with one of these themes simply search for OceanWP, Astra or GeneratePress. Once you have found the theme just click on the image to install:
After the installation is finished the install button will turn to an ‘activate’ button. Click on it to activate the theme. It will then redirect you to the themes settings/options page. There you can start to customise your new site 😊
Pro Tip: Do you want to experiment around a little (which you should)? to see what the 3 different themes would look like with imported demos. Or to see what options there are, then go ahead and install away. Read this post to see how you can reset the site back to its default state, pretty easily.
Step 5: Adding content to your new website
This is the fun part. If you are using one of the recommended themes above then it’s as simple as importing one of the many demos. This will import the pages, posts, images, dummy text, required plugins and settings.
Here is what the OceanWP set up wizard looks like:
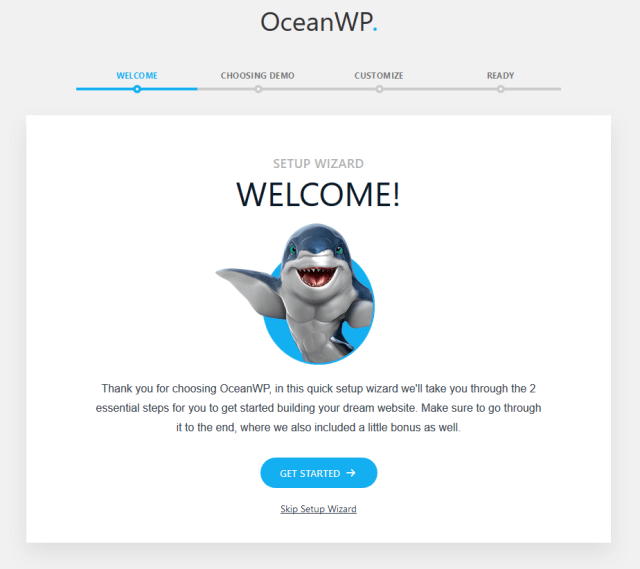
It’s a nifty little wizard which will guide you through the whole process. You will get to choose a demo to import and set some of the general settings for the demo like:
- Uploading your logo.
- Changing your site title.
- Selecting your primary colours.
After it completes you can begin to customise your new site. First steps are by updating the content (text) throughout the site.
Take note: during the setup wizard, some essential settings were updated for you automatically. This is to ensure your new site works flawlessly:
- The static front page and blog page setting were set for you.
- Common website pages were created for you (about/services pages).
- Menu locations and menu links were created.
- Widgets and sidebars were also created.
You can change or update these at any time. But the beauty of using a quality free WordPress theme is that 95% of the settings are done for you. In the majority of cases, you won’t need to change any of these settings later on.
This allows you to put your full focus into replacing dummy sections and dummy text in pages with your own unique content to quickly get your website live.
1. Updating and editing your content
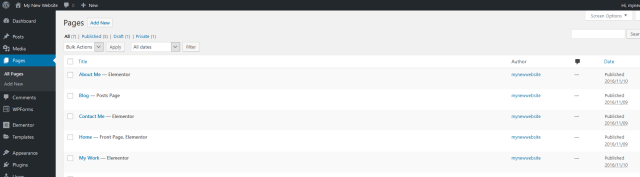
During the import process, all the demo’s pages were added. To view them go to your WordPress dashboard and click on the pages link in the left-hand sidebar. You will be taken to the section where all the available pages are shown:
These pages have dummy sections which have lore Ipsum (dummy text) and images. What you want to do is to update the dummy text and replace any images you need to. You should keep the sections and layouts how they are, although you can change these too if you want.
It’s very easy to make the edits. Depending on the demo you installed you will get a similar screen to this:
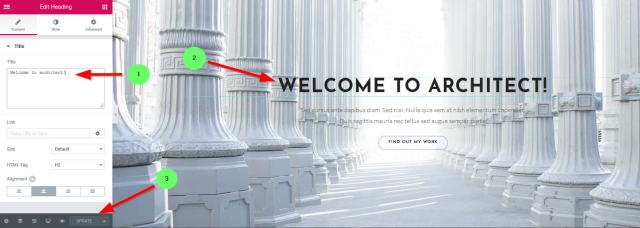
- You can either use box 1 to update the text for different areas
- Update text directly inline (box 2) to make your text changes.
- Change various other options, like changing the heading size, colour and font.
- Once you’re happy simply click the update button (box 3).
It’s very easy to do. Simply work your way around all the areas you want to change, make your edits and hit update. It will instantly update the frontend of your website.
You can take the same steps for all the other pages. As these are imported demo pages they already have all the menus created and linked. This allows them to be accessible from the frontend of your new website. There is nothing really to do apart from updating the content 😊
2. Adding new pages
Do you want to add new pages that are available like your other pages on the site? OR perhaps you want a new service page? Then follow these steps:
- Under the ‘pages’ link in the right-hand sidebar, you also have an ’Add New’ link. Clicking on this will allow you to create a new page.
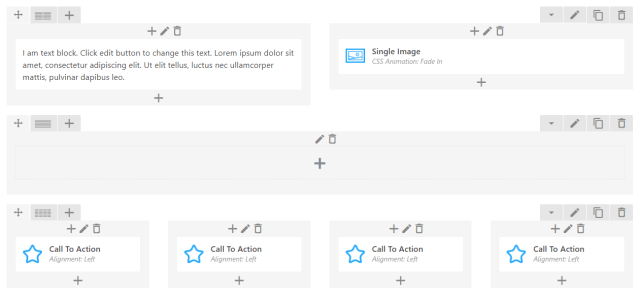
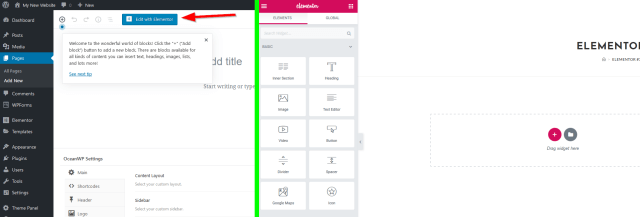
- The following screen looks much like a Microsoft word doc. Here you can add in your text, images and sections. You can also switch to the page builder using the button to use the drag and drop builder instead:
- After you’re done adding in your content and making your changes hit the publish button.
All done! Your new page is now live on your site. The next step is to create a menu link to your new page!
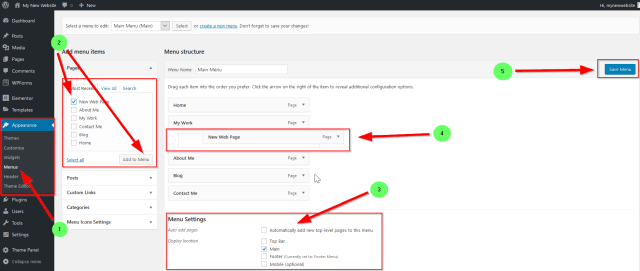
3. Adding your new pages to the menu
Once you’re finished creating your new pages you can add them to the different menus that exist on your website. The common menus are the header menu and the footer menu.
- From the WordPress sidebar, click ‘menus’ under ‘Appearance’.
- Then select the page you want to add by using the checkbox and click ‘add to menu‘.
- Select the menu you want to add your new page to header or footer.
- By default, the page gets added to the bottom. You can rearrange the order by dragging it to a new position.
- Once your happy hit ‘save menu’.
WordPress Plugins: what are they, how to install them and which ones are essential?
Now that you have a WordPress website up and running, it’s recommended to install some essential plugins. These will build upon the solid foundations you have created. This will help your sites online visibility. It will also reinforce any online marketing that you undoubtedly start!
WordPress plugins enhance the features and functions available to your default WordPress install. Sometimes they bridge the gap of missing core features and other times they are complementary to existing features.
You won’t need a developer to implement the plugins or learn any code yourself. It’s pretty straight forward.
1. Installing WordPress plugins
To date, there are over 50, 000+ plugins in the official WordPress repository. You have a huge choice of plugins offering every feature you could ever want.
Start by going to ‘Plugins > Add New’ from your WordPress dashboard. Simply search for the type of feature you want i.e. photo gallery, forms etc.
Once you have found a plugin simply click the button to install the plugin. That’s it. Nothing too fancy.
Before you get ahead of yourself and start installing every plugin known to man, we have made a small list of the essential plugins you should be using.
These essential plugins together with the theme you have chosen should be all you need for a super-fast professional website. This will also search engine friendly.
This is not an exhaustive list but a list of plugins that we always use when we design and deploy a website.
i. Askimet Plugin
This will stop a huge amount of spam from ever hitting your website via your contact forms and comments.
It integrates with all the popular forms like ContactForm7, NinjaForms, GravityForms and many more to provide you with robust spam protection.
Askimet will silently remove the worst spam and then leave the rest for you to moderate if you want. Its free to signup to and use for a personal website.
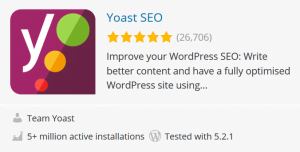
ii. Yoast SEO Plugin
By far one of the best SEO plugins for WordPress. This plugin adds in features to your pages and posts for you to define your SEO friendly titles, descriptions and meta information. It will also show you how well your content is optimised via a traffic light system.
It has extra functionality for creating sitemaps, images and author information. Using this plugin, the search engines will get all the right signals from your website.
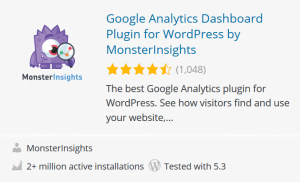
iii. Monster Insights Plugin
This hooks up your WordPress site with Google Analytics, both of which are free.
You definitely want to monitor where your website traffic is coming from. Who your visitors are. How long they stay. What the most popular pages are etc…
This plugin sends all that data (and more) to Google analytics so you can start making data-driven decisions to grow your website.
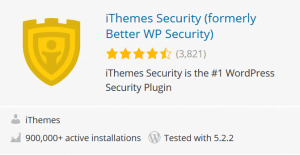
iv. iThemes Security Plugin
As the name suggests, this plugin secures your WordPress website. It has over 30 options to protect and secure your site. From changing your login URL to away mode which restricts the times that the admin dashboard can be accessed.
It also fixes the common holes and obscure vulnerabilities WordPress may have. Plus adds many advanced features that will help to prevent common attacks and the prospect of your website getting hacked.
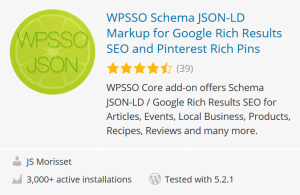
v. WPSSO JSON-LD Plugin
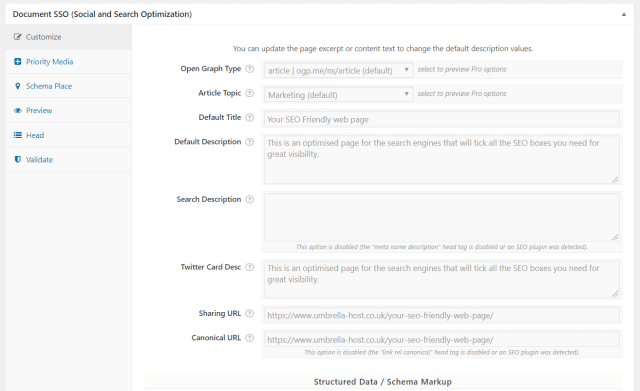
JSON-LD will add in the required schema data that the search engines will be looking for. It pretty comprehensive and will automatically pull in the required information from your page/post.
You can also change the information it pulls from your content and specifies alternatives.
There are 4 other plugins by this author that can be used to further enhance the schema data that your website outputs. A highly recommended plugin.
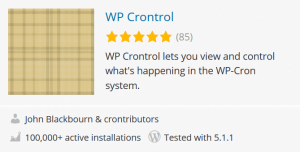
vi. WP Control Plugin
Essentially a step you took earlier on was to disable the built-in WordPress cron.
The cron runs every few seconds depending on what you are doing or if you have visitors on your site. Realistically it doesn’t need to run every few seconds.
All that does is uses up the hosting resources which are best used to serve your site to visitors. This plugin takes care of all that. You can see the various scheduled cron jobs that need to be run and schedule them at better times. This will free up your hosting resources and allow your site to load much faster.
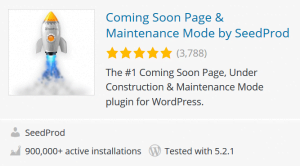
vii. Coming Soon by SeedProd Plugin
One of the best coming soon plugins available. You don’t want to showcase your website when your busy designing or editing it. The whole world and especially the search engines will see it in such a mess and that will definitely send out the wrong signals.
That’s not going to be professional at all. This plugin will display a nice coming soon page to visitors. Plus SEO friendly code to the search engines until your ready to officially launch your website. Pro tip: make sure disable this when your done designing/editing your website!
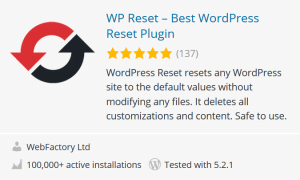
viii. WP Reset Plugin
Quickly reset all the customisations you made on your site and restore WordPress to its default state.
It’s perfect if you are testing a few themes out to see which one works best for you rather than just staring at a demo.
Pro Tip: once you have selected your theme and options deactivate this plugin or better still delete it. This is not for live/production environments.
WordPress Tweaks Basic tweaks and further customisation
Before we wrap up on the WordPress side and you launch your website. There are also a few basic tweaks you can make to your WordPress installation. They help it run a little smoother.
A key thing to remember is that many of these settings wouldn’t have changed OR updated. Even if you installed a demo and imported its settings.
Again, this is not an exhaustive list but more of a ‘recommended edits list’ you can make. They a pretty straight forward and easy to make. You don’t have to update these settings but it can be very helpful!
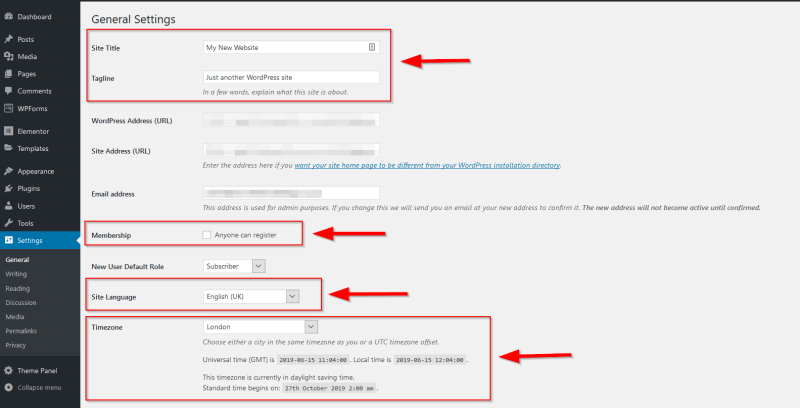
- Settings > General – On this page, you can update the following:
- Site title & the tag line – You generally don’t need to update these. The Yoast SEO plugin will allow you to change and update all your page/post titles and descriptions directly when adding or editin g pages/posts. Just make sure that these default tags accurately reflect what your website is about. Keep them short and sweet!
- Membership options – Prevent users from registering on the site if only a few people need admin access. Visitors will still be able to browse pages and send you messages etc but won’t be able to register. This is helpful as it stops bots and ‘dodgy’ people from registering. But, if you’re going to be selling products or offering services then keep this unchecked.
- Site Language – This is usually the one setting that’s missed out the most! Selecting your correct language ensures the correct update for your site with the right translation is used. It also adds in a snippet of code on the frontend. This will state to the search engines which country your website belongs to.
- Time zone – not hugely important but helpful. Adjust to your current location so that times and dates are displayed correctly.
- Settings > Reading – There is one super important setting on this page. You need to ensure it is set correctly:
- Search engine visibility – Ensure that this box isn’t checked. If it is then you are telling the search engine not to index and store your website. A big ‘no no’.
- Settings > Discussion – This page controls how users interact with your site. When they want to partake in discussions and leave comments. You can adjust the settings on this page to suit your own needs. You can completely turn off the comments or adjust them to a setting you desire.
- Default setting – Allowing people to comment. Check or uncheck the box to allow or disallow comments on pages/posts on your website. Adjusting this setting will apply it sitewide.

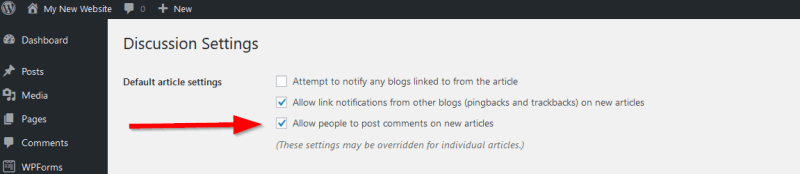
You can also adjust this setting per page/post. So, you could have this option unchecked on the general discussion setting page. Then disable comments and discussions on a per page/post basis.
Congratulations Your professional website is now ready to go live.
You can now deactivate the website coming soon option. You should have installed and activated a few steps ago. Once deactivated your new professional website design will be available to all your visitors. The super friendly SEO code will also start to get crawled by the search engines.
On that note. The very last step we recommend you take after making your website live is to setup website tracking. This will inform the search engines that your site is live and ready for them to send you targeted traffic!
BONUS – Step 6: Setting up tracking and related services
The following services are free to set up and use. Using them will allow you to make data-driven decisions. You can decide how to market your website effectively in the search engines to attract more visitors to your site. You will be able to see how much traffic your website is getting, where it’s coming from and what that traffic is doing once it gets to your site. All invaluable information for you to succeed!
Its also going to allow you to address any issues that those search engines may be aware of. They will highlight any issues with regards to your site is mobile friendly or not. How well it’s performing by showing you the number of impressions and click it’s getting from search results. As well as key keyword information.
So, let’s jump in and get started:
1. Google Analytics
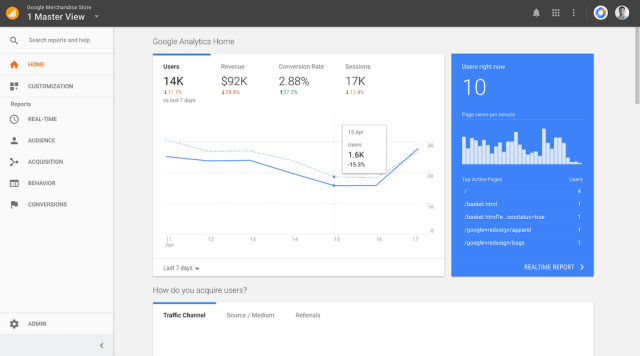
This is the best free web analytics software available. It’s offered by Google, the biggest search engine on the planet. It collects data from your website which will then allow you to track and report on your website traffic. To get started, follow these steps:
- Visit this page it outlines in detail all the steps you need to take to set up Google Analytics for your website. Follow them until you have a tracking code.
- Take the tracking ID that you created for you in the earlier steps.
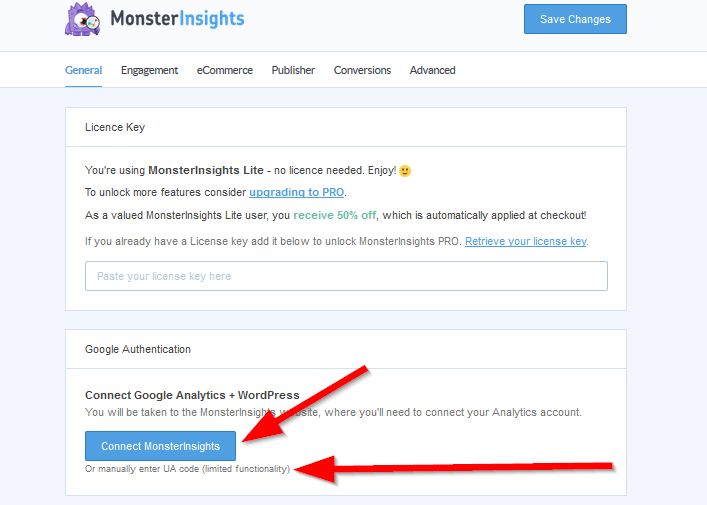
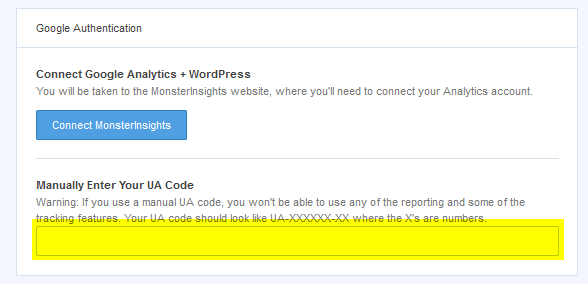
- Head over to the Monster Insight plugin settings: WordPress Dashboard > Insights > Settings
- b. Either connect your website to Google analytics using the button
- OR our preferred method is to input the tracking ID manually.
That’s it. You will get a confirmation when everything gets connected. Your website will now start sending data to Google Analytics. It usually takes 24 hours for the data to start flowing. After which you can start to view that data in analytics.
2. Google Search Console

Search console is another free service provided by Google. It will allow you to monitor and troubleshoot your website’s presence in Google’s search results. Once you have connected and verified your site. Search console will give you access to tools and reports. These will allow you to see errors that Google has picked up on.
Search console will also show you how your site is performing. It does this by displaying the number of impressions and clicks the site gets in search results. It also shows you how many links point to your website and your top performing keywords.
Visit the ‘Getting started documentation’ to begin. Select whichever role applies to you and you will be given steps to take.
Search console is another free service provided by Google. It will allow you to monitor and troubleshoot your website’s presence in Google’s search results. Once you have connected and verified your site. Search console will give you access to tools and reports. These will allow you to see errors that Google has picked up on.
Search console will also show you how your site is performing. It does this by displaying the number of impressions and clicks the site gets in search results. It also shows you how many links are pointed to your website and your top performing keywords.
Pro Tip: You can also connect the search console to analytics using these steps : https://support.google.com/analytics/answer/1308621?hl=en
If you fancy watching a video on how to do this:
That’s it, all done! You should now have a professionally designed website that hasn’t cost you any money. It’s connected to tracking services for you to take the data and make informed decisions.
Now all you need to do is promote and market your website using the data at our disposal 😊
I hope you found all this information useful and it helps you create and design a professional website.
Did I miss anything?
Are you confident now in being able to create and design your own website?
Is there anything that has been missed out that you felt should have been included.
Either way, let us know by leaving a comment below.
