
Your WordPress website has been hacked! Those are the words you never want to hear. Perhaps you found out when your web hosting company emailed you, a customer contacted you or when you visited your own site and saw signs of a hack.
Even worse you only realised when you were investigating why your traffic tanked. You checked your unlimited plan server logs and realised it was due to malware or hack on the site.
What do you do? How can you quickly fix your site?
In our article, I am going to cover in-depth how you can clean your site from the hack. Remove any malware and implement security so that it doesn’t happen again.
I will walk you through the steps one by one so even a beginner can recover their hacked WordPress website.
Before we start lets quickly cover why this could have happened.
There are many reasons why your WordPress site was hacked. As the popularity of WordPress grows, currently powering over 34% of website online, so does the potential of WordPress hosting sites being targeted as a prime candidate for a hack.
According to the latest report by Sucuri in 2018 WordPress accounts for over 90% of all infected CMS platforms found on the web.
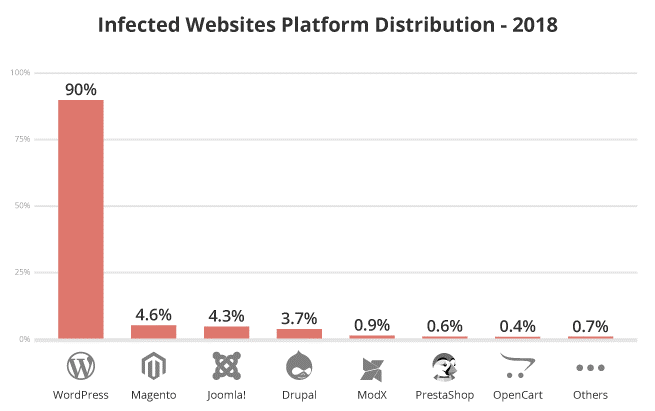
Source: https://sucuri.net/reports/2018-hacked-website-report/
However, that statistic shouldn’t put you off from using WordPress as your CMS of choice. A lack of basic security and general maintenance is often the root cause.
Keep in mind. Even with a super-secure site people with malicious intent or a determined hacker will still try and find loopholes and access points in which to hack your site. This can happen on any CMS and not just WordPress.
Let’s get cracking and recover your site from the hack by taking the following steps.
Step 0: Don’t Panic – Stay Calm
First things first. Keep calm! You need to focus your energy on fixing the site and not stressing out. It’s not the end of the world and you can recover the site with a little time and effort.

The steps below should be simple enough even for a beginner to follow and fix their site after a hack.
However, there will be some that are uncomfortable in dealing with website security, code and possibly servers.
If your one of those people, then I would recommend that you approach a professional to help you. Think of your developer or agency who built the site. They can help.
Step 1: Check for a Hack
This may sound a little silly but confirm that you have been hacked and to what extent. It may look like a hack but the site may be experiencing a technical issue so you would want to rule that out first.
Get in touch with your web hosting company and confirm that your issue is not due to an update of software on the server.
This can often be the case when using a shared hosting plan where updates are required to keep servers secure.
Of course, if you see something like this for your homepage then clearly your site has been hacked.

Otherwise, it may not be so obvious and only be present in certain situations i.e. on specific pages, strange ads, mysterious redirects etc.
To save some time go through this quick checklist. Ask yourself the following questions in preparation for removing the hack and cleaning infected files.
- When was the last time the site looked how it should?
- Is google displaying a security warning when visiting the site?
- Can you login to your WordPress admin?
- Does the website redirect to another site?
- Is the hack present on each page? Or is it random?
- Are strange ads appearing on the site?
Make a note of your answers. This can potentially narrow down and help you to Identify what type of hack has taken place.
This information can then be used to pass on to your hosting company or another professional if you’re not going to be dealing with the fix yourself.
Or if you’re going to be following this guide and steps, then it will help you to understand what type of hack and infected file(s) could be affecting the site.
Here are the common files which can get affected in a hack.
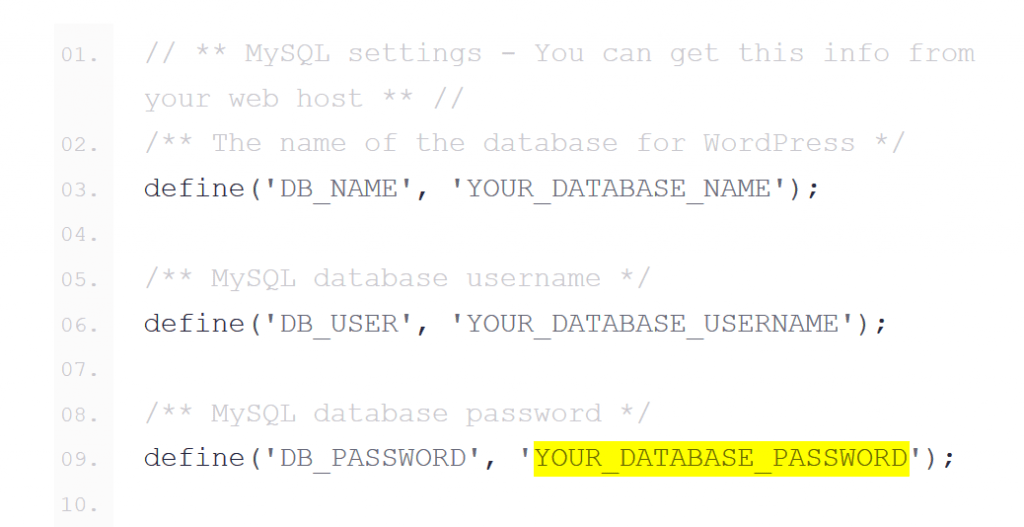
WordPress config file hack – The wp-config.php as default lives in your root folder. Its an extremely important file. It includes the database credentials for the website to connect to its database.
It also contains the security keys for your site as well as other important information for running your website efficiently.
Due to the importance and sensitive nature of this file, it’s a prime target to be attacked. It cannot be accessed directly unless a plugin with a critical flaw is being used. The plugin can then reveal this file to the public and the hacker.
WordPress htaccess Hack – This is another important file. It’s a very powerful file which also helps to run the site. It’s commonly used for your redirects, permalink setup, SSL usage, caching, hotlinking and managing your file extensions to name a few.
A .htaccess hack could take over your website URLs and redirect them to another site. A common way this works is if your website visitors arrive from specific search engines, they then get redirected to a 3rd party site.
Code like this indicates a .htaccess hack.
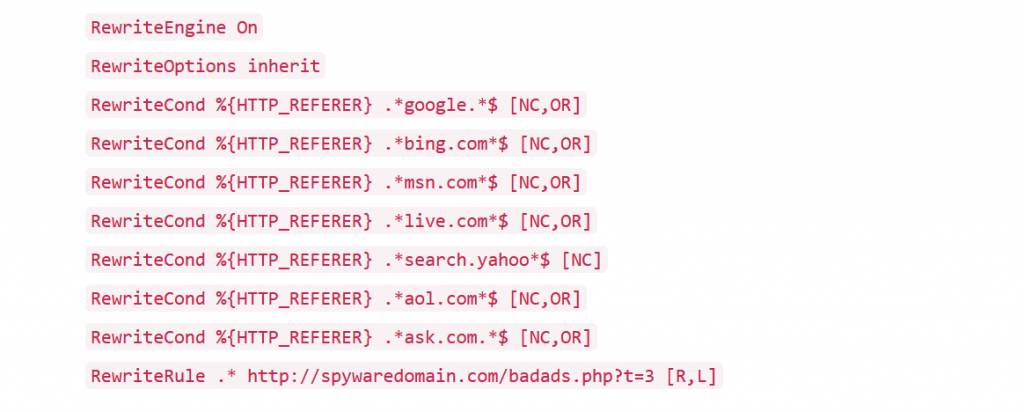
It’s also a common tactic used to get the power of your website and its backlinks pointing to another domain to increase its website ranking.
WordPress index File hack – The index.php file is used to serve core WordPress web hosting files and all your different theme files. A index.php hack could involve the inclusion of hacked files with your normal files which in turn get included on all the sites pages.
Typical hacks involve adding in base64 code like below.
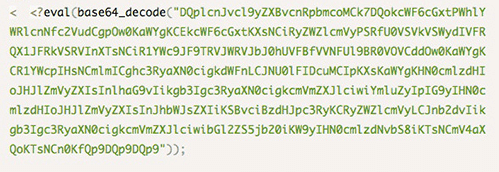
This can result in strange ads popping up on the site or strange redirects taking place.
WordPress Theme File Hacks – Common files that your theme would use to display your website are the header.php, footer.php and functions.php files.
These files are used to display the headers and footers of your site. They control any theme-specific functions your website may require.
When these files are hacked, they usually result in inclusions of nasty files throughout your website.
These can be iframe files, base64 code and/or JavaScript files which can either redirect a site, show ads or in worst-case scenarios, install malware/viruses.
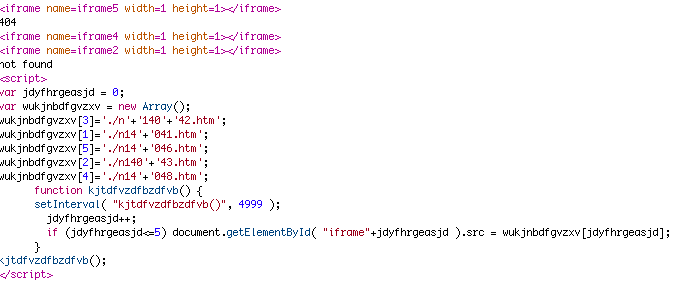
Code as in the example above could indicate those files are infected and would require closer inspection.
Step 2: Create a Backup
Take a backup of the current WordPress site now. Why? Its hacked! Why do I want a backup of a hacked site?
Well, it’s a good idea for a few reasons.
- Your WordPress web host may delete the site to protect other users on the server.
- You can problem shoot at a later stage on a local/dev box.
- Having an extra backup isn’t a bad idea.
- You can provide the backup to professionals to analyse externally without direct access to the site/server.
- If things get worse then at the very least, you have a backup that’s not as corrupted.
Now that you understand the importance of taking a backup take one via your hosting account. Make sure your backup includes your files and the database.
Step 3: Restore a Backup
Have you been taking regular backups? Then this may be a time for you to smile. 😊
If you can restore a backup to a point before the hack (look at questions in step 1 above) then it’s going be much easier and faster for you to recover your website.
You can simply restore your site. Then take steps to secure your site by changing passwords etc. so a new hack cannot happen. Remember it’s still vulnerable if you don’t take these crucial steps.
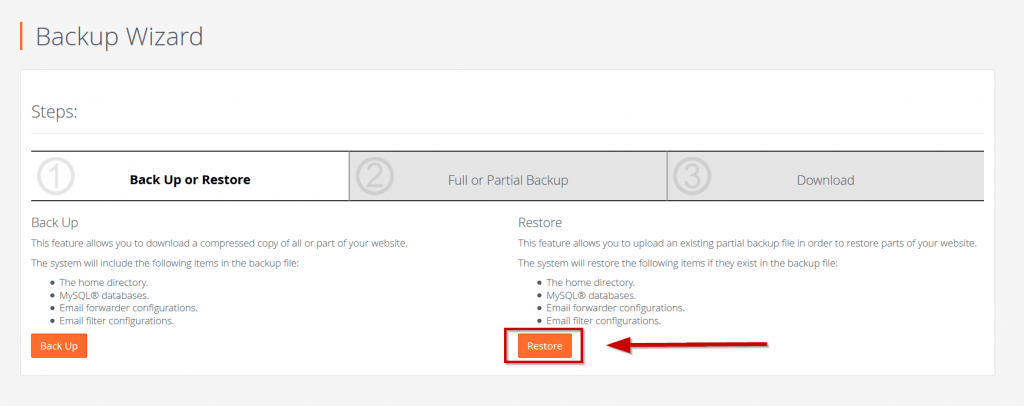
However, if you have a very active site where you have published loads of posts/pages and have had a flood of comments or even ecommerce transactions then a restore won’t help.
You will lose all your data by doing a restore. Your only other option is to find the hack and manually remove it from any of your website’s files.
Simply follow the steps below.
It’s important that you take the above steps and prepare before starting step 5. They will help in case anything goes wrong!
Now that you have completed your preparations is time to find the hack. We will use a combination of manual and automated tools to find and identify the hack before removing and securing your website.
Step 4: Perform a Scan(s)
In this step, you are going to scan all your website files to see if you can find the hack. This may be in 1 or more files, so a full site scan is recommended.
This can be done manually by using your FTP account with a programme like FileZilla or using an automated tool.
An automated scan using a WordPress plugin or external service is recommended as its quick and easy to do. The only time you will need to manually scan for a hack is if you’re:
- Unable to access WordPress admin.
- Your site is down and cannot be accessed externally.
If you must scan manually then you will need to inspect all the files manually. Use a programme like FileZilla to access your hosting account via SFTP.
TIP: don’t use the standard FTP protocol as it’s insecure, instead use SFTP.
Review the last modified date column for all files and make a note of any recently modified files.
Using the FTP client download all your files locally. Then open the files which you identified as recently modified above in your favourite programme i.e. notepad++, PHPStorm or similar.
Look for the hack which can be identified like the code shown in step 1 above.
i. Run Automated Scans
Before you initiate a scan check which plugins and themes are installed on your WordPress install.
Delete any plugins and themes which don’t look familiar or make them inactive. In later steps, you will review these and remove them if necessary.
Often the hacker uses these to insert a backdoor to access your site after you have cleaned it. They are smart so you must be smarter!
To start off we are going to use 2 plugins to scan your full website and hunt down any infections, malware and malicious payloads that may exist.
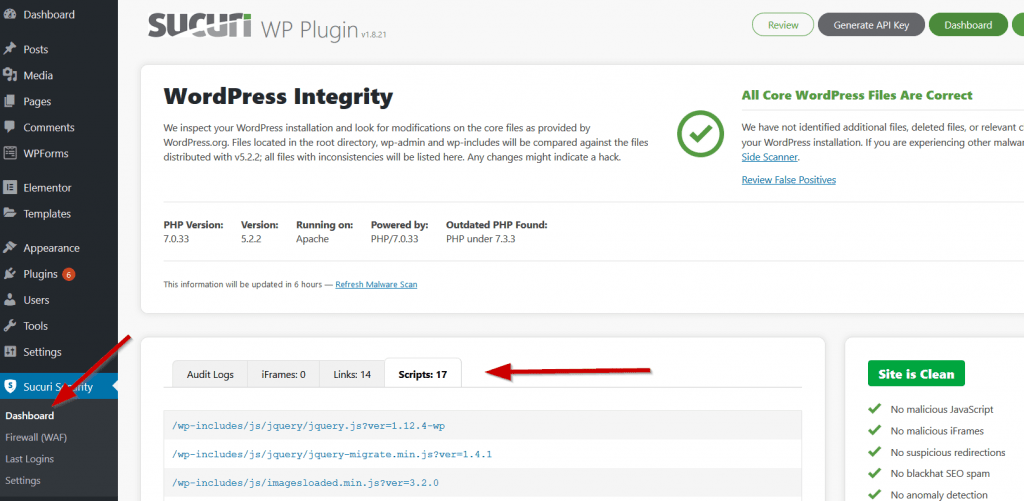
The first plugin is the Sucuri WordPress Scanner. This will help find any and malware, malicious payloads and security issues on your website.
It will also show you the blacklist status of your site on major platforms.
To install it head over to your WordPress Admin > Plugins > Add New. Search for Sucuri WordPress. Once you have found it hit ‘Install’ and then ‘activate’.
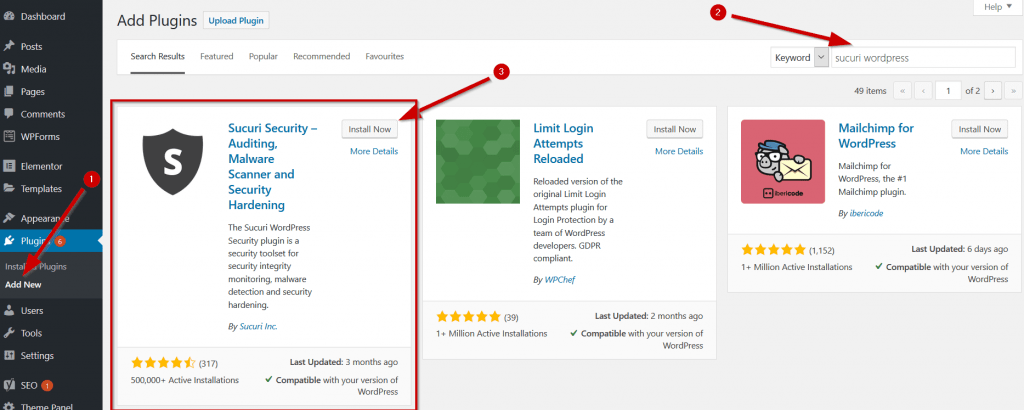
When the plugin is activated head over to the plugin’s Dashboard Admin > Sucuri Security > Dashboard.
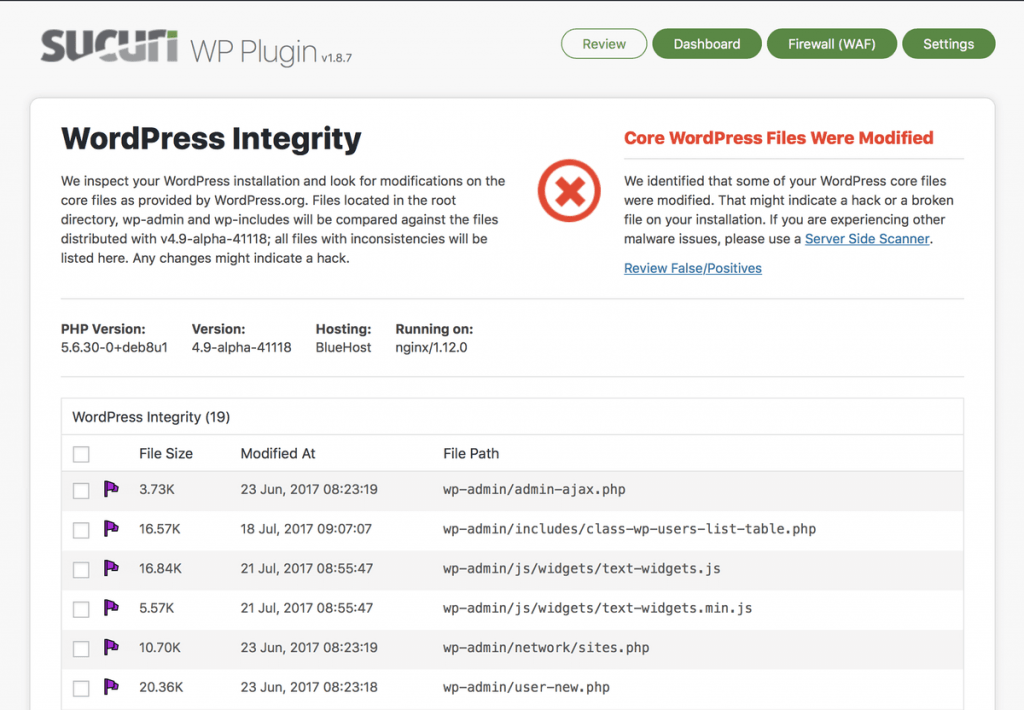
If the Sucuri plugin has found any infections, then it will display a message with further details. It will indicate what type of infection it has found and the files that are infected.
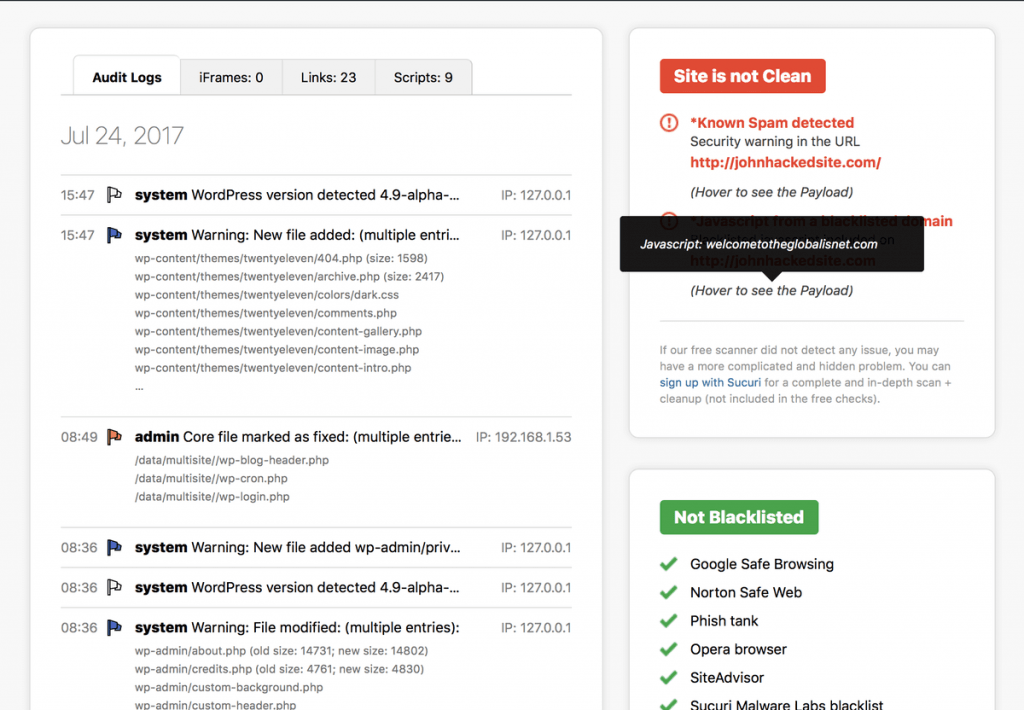
The plugin will also compare the core WordPress files of your site with files that come bundled with an official version.
If there are any differences or it shows files have been modified, then it will display a warning message. You can then run the built-in diff utility to see what the modifications and differences are.
If your website is clean that’s good. But you should still manually review the Scripts/iFrames/Links tabs of the plugin to look for any suspicious files and activity.
The second plugin that you should use is the Theme Authenticity Checker plugin. As the name suggests it will check all theme files for any infections.
When you run this plugin, it will check for any suspicious or malicious code present within your theme(s).
The theme authenticity plugin runs automatically. To view the results, go to the dashboard via Appearance > TAC, there you will see the results of its scan.
If you have malware or obfuscated code it will tell you which theme it’s in and the location.
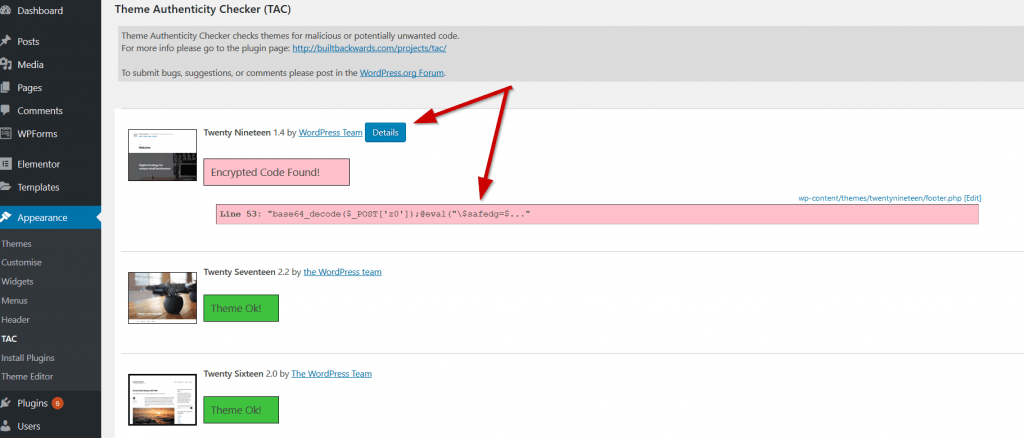
Click on the Details button to display the code and its location.
Although the Sucuri plugin also checked the same theme files this plugin goes a little deeper. It looks for obfuscated code and malware which clearly had been missed by Sucuri.
If you don’t have any infections or obfuscated code, then your theme will be marked as Theme OK.
ii. Use an External Service
So far you have used plugins added to your WordPress site to identify any infections. But, you can also use an external tool to scan your site.
It’s highly recommended as it provides you with a good overview. Each tool scans differently and provides different information.
The more information you have at your disposal the quicker you will be able to clean the infection and keep it out for good!
We have found the best online 3rd party tool is Sucuri. Yes, it’s like the plugin version but gives a few extra results. Go here to start a scan.
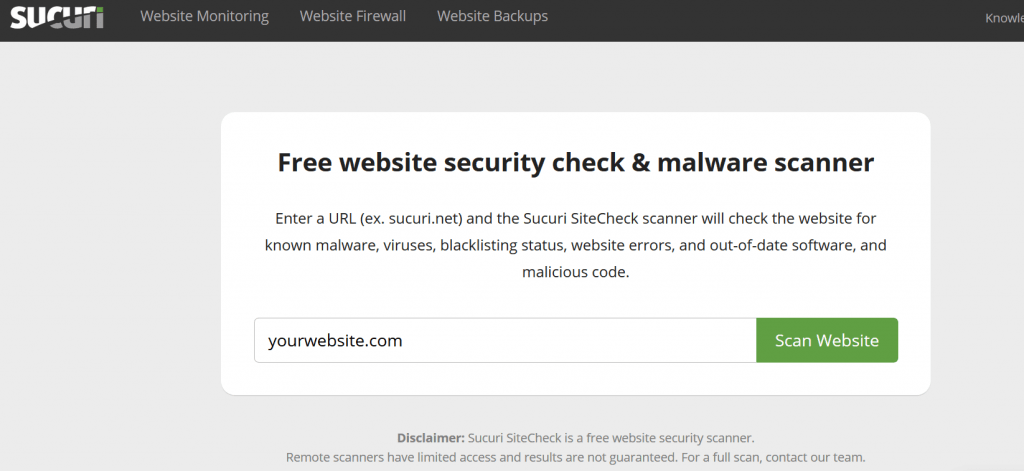
Make a note of any additional results that were not in your own automated scans. You will need that information when you begin to clean and recover your site.
iii. Check Google Diagnostic Page
Every time a website gets hacked the search engines, especially Google, pick up on it quickly and blacklist the site to protect its users.
It’s important to check if your website is blacklisted or shows any warning messages so that you can fix this after your clean-up.
Go to the Google safe browsing page and pop in your URL to check the status of your website.
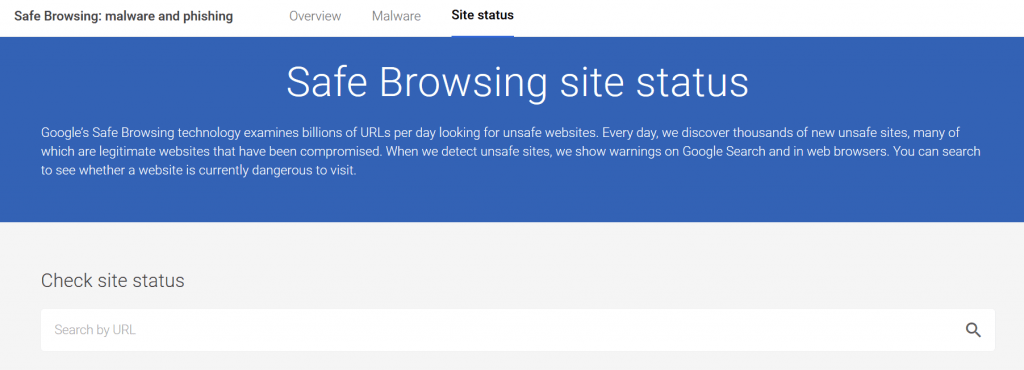
It’s a very quick way to check if the site is blacklisted. Google will display information about any malicious redirects, spam or malware on the site together with details of its most recent scan of your website.
Google also provides search console access which has a deeper report on the security and performance of your website. It’s free to sign up to and highly recommended.
Step 5: Review Infected Files
Now you have completed your scans its time to review the code. The scans will have revealed the location and names of files that are potentially infected.
In step 1 we identified the various types of files that are common in an attack. Use this as a cross-reference for the files that are identified as being hacked or infected by your scan(s).
This will help you with your clean-up in the following step.
Change Passwords & Secure User Accounts
Changing passwords and securing user access to your WordPress install and environment is a crucial step prior to starting a clean-up.
The last thing you want is for the infection to resurface or get re-hacked whilst your cleaning files as a hacker may still have access!
You should assume that all your passwords are compromised.
Thus, it’s crucial that you update the following passwords: Hosting account, FTP, MYSQL, WordPress Admin and restrict access to your WordPress users during the clean-up phase.
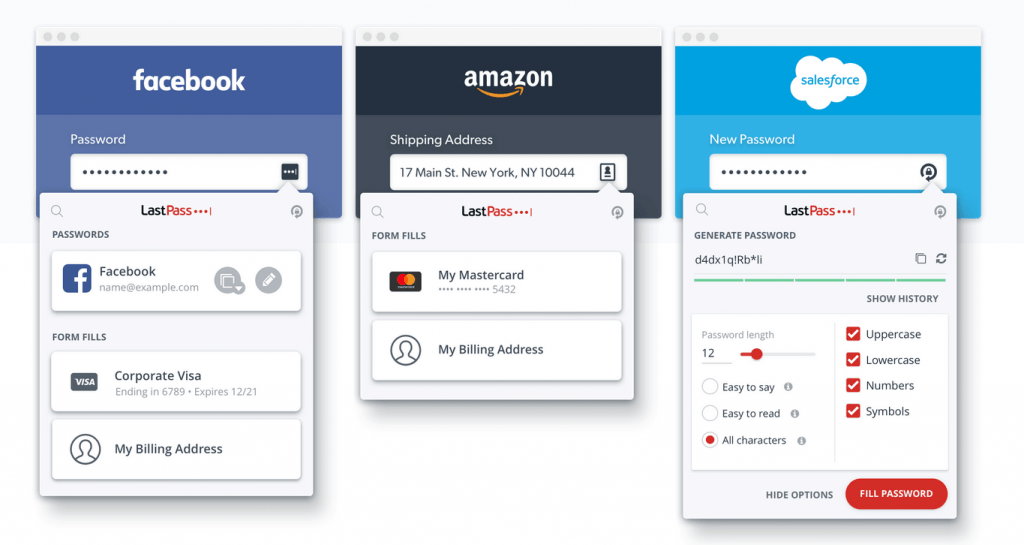
With the changes, you are about to make you need to use secure passwords. There are plenty of online password generators that you can use for strong secure passwords.
Tip: Don’t use the same password for all your services! Many people use the same password for everything. This is very insecure and if that password is leaked then this leaves all your accounts open to attack.
With all the random passwords you are going to generate it’s going to be very hard for you to remember each one.
Thankfully you won’t have to remember them if you use a good tool. We love to use LastPass which not only remembers your passwords in a secure vault only accessible by you, but it also has a random password generator built-in!
Complete the steps in this order. This will ensure that only you have access whilst you’re performing a clean.
i. Change the hosting control panel password
This is the password used to access your hosting control panel where you can access your website files, email accounts, databases and a whole load of other features.
ii. FTP Password
You may have inadvertently leaked your FTP details, and this could have been a point of attack for a hacker.
Its best practice to change your main FTP account password and any additional FTP account passwords now.
iii. Update MySQL password
If a hacker has gained access to your site OR the wp-config.php file has been infiltrated then you should change this password.
You can change the MySQL database password via your web hosting control panel.
Don’t forget to update your wp-config.php file with the new password or your site will not be able to connect to the database.
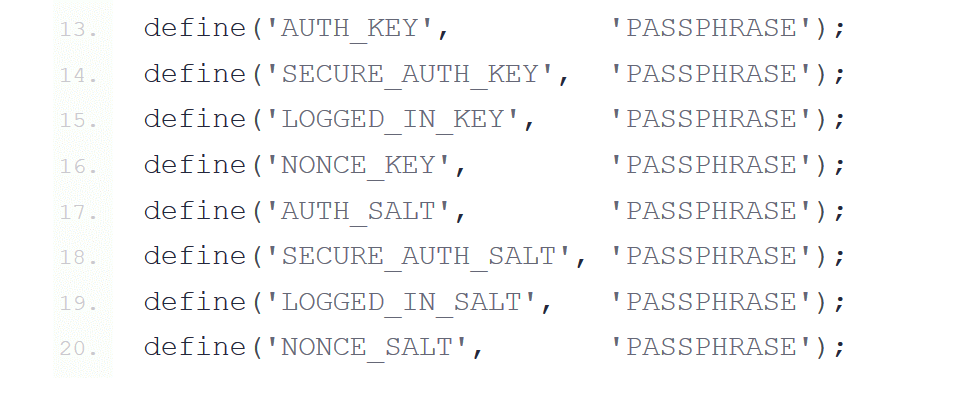
iv. Update your SALT Keys
These are a set of keys that are used to access various services your WordPress site needs like cookies, API access etc.
Visit this URL for WordPress to generate a fresh set of security keys for your site. Then simply copy and paste the new set of keys and overwrite the existing ones in the wp-config.php file
v. Secure User Accounts
Inspect the WordPress user accounts that are active on your site.
Review all the accounts and remove any suspicious or unfamiliar accounts. As a precaution change the permissions on the remaining user accounts to the subscriber role whilst only keeping 1 admin account.
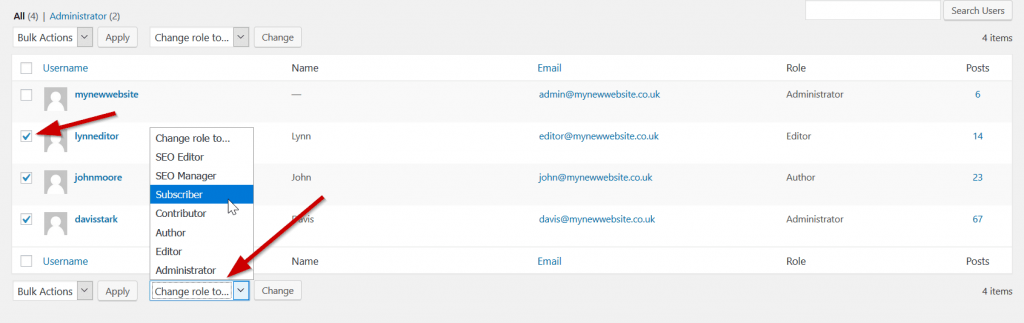
As well as changing the roles you should also change the account passwords.
You can change the roles back and update the users with their new passwords after you have cleaned your site of the infection and hack.
Step 6: Clean up Your Files
Now that you have all the information to hand, potential locations of infected files, changed your passwords and user permissions you can safely start to clean the hack and restore the site to a clean state.
i. Clean files
If you have found the infection in your core files, then you can manually remove these infections.
If they are 1 of the core files as indicated in step 1 then remove the malicious code manually.
For other core WordPress files, you can safely restore a backup if you have one OR use fresh files from the official WordPress GitHub repo.
TIP: Don’t overwrite the following files: wp-config.php .htaccess. Also, make sure you manually overwrite the wp-content folder carefully. It contains your active theme and plugins.
For any premium files (think themes or plugins) open them up with your editor (notepad++) and remove the infection manually.
After you have made changes to all your infected files visit the frontend of your website to make sure it still works.
You can also rerun step 4 if you want to be super confident that all the infections have been removed. If that’s the case the scans will confirm this.
ii. Clean the Database
Your database may be also be infected with suspicious links, spammy keywords and dodgy comments. To remove any infections, you will need to access your database.
Login to your hosting control panel and access your database using PhpMyAdmin. This is a common interface for managing the tables of your database.
You can use the search option to search for words and links that may indicate an infection.

If you are not comfortable directly accessing the database then you can use a 3rd party tool. Use the search and replace DB tool to access your database to search for and remove suspicious links and spam.
Your search should include information and words provided by your scan from step 4. Also, you should search for the following words: eval, base64_decode, gzinflate, preg_replace, str_replace.
Manually remove any suspicious content from the tables one by one. Each time test the frontend of the site to make sure it still works.
TIP: If you used a 3rd party tool, remember to remove it from your account as it provides direct access to your DB. This can be an access point for a future hack!
iii. Remove Backdoors
Next, check for any hidden backdoors. Hackers are smart. They will expect you to find the infection and remove it. SO, in that case, they will leave a backdoor which will allow them access again!
Backdoors are often found in files with names like WordPress core files. They are often located outside of normal core directories.
Backdoors can also be injected into your wp-config.php, index.php and common directories like /uploads, /themes and /plugins.
Manually search for any of the following words within files and directories:
eval, base64, assert, stripslashes, move_uploaded_file, str_rot13, system, preg_replace, gzuncompress and exec.
You need to be very careful when searching for such strings. These can often be used legitimately by plugins and themes for your site to function correctly.
Before removing them either compare the file with such words in original files or remove them 1-by-1 testing that your website works each time.
iv. Remove Old Files
Often when a developer has been working on your site to make updates and changes, they will rename unmodified files by adding an extension like .old OR .bak.
As an example, they may rename index.php to index.php.bak. These types of files are a prime target for hackers as they can contain sensitive information and as such should be removed.

Another common problem is when a rebrand or redesign is being done. A developer will copy the old site into a folder called /old/. These old files are still a point of access for a hacker and should also be removed.
Also look for any additional files, which can be potential access points. A copy of your database may exist in a .sql format and/or backup files of your entire site in a tr.gz format.
v. Delete Plugins & Themes
Although you may have removed suspicious plugins and themes prior to commencing a scan it is worthwhile rechecking the ones you didn’t remove again.
Ideally, for your themes, you should keep only your active theme and the latest default WordPress theme (twenty nineteen). This is used as a fallback if your active theme experiences problems.
TIP: If your using a child theme then ensure you don’t delete the parent theme. If you do your site will break!
The same goes for your plugins. Often WordPress users will add in a plugin to check out the functionality. After testing, rather than deleting that plugin it’s made inactive.
Although that generally doesn’t create any problems, as your site has been hacked it’s better to delete any inactive plugins. It’s better to be safe than sorry!
Lastly, review the plugins that you are using. Are they regularly updated? Supported?
Many plugins become retired or made redundant as the developer has moved on.
Even though the plugin still works and is currently safe to use, because it’s no longer maintained it could be suspectable and vulnerable to a future hack.
Look for an alternative which is actively maintained and has good support and reviews from other users.
vi. Perform Updates
Now that you have cleaned your files and hopefully removed any infections it time to update everything.
Keeping the WordPress install, themes and plugins up to date will ensure any code used on your website is up to date. Any vulnerabilities and security issues are addressed by simply performing updates.
TIP: After each update visit the frontend of your site and hit refresh. Make sure the site works how it’s supposed to before completing the next update.
Firstly, update your WordPress install by visiting your admin and click updates link under your dashboard menu.
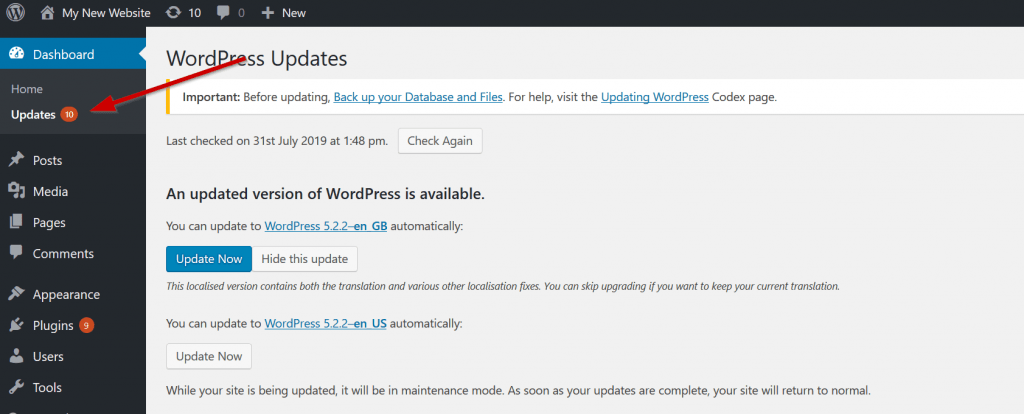
Hit the blue update now button to begin updating your install. Wait for it to complete.
You may be prompted to update your database during this process. Hit OK.
When it’s all completed you will be taken to the ‘What’s new with WordPress’ page. This page details new features that are available.
Second, update your theme. Your first step will be to update the default theme(s) that are shipped with WordPress.
Then update your active theme.
If your using a premium theme you may not see an update for it. Visit the themes changelog page (if available) and review any available updates.
A properly coded theme will generally work with any new WordPress versions and may not require an update.
You may, however, find that bugs, vulnerabilities and other security issues have been addressed so a manual update is highly recommended.
Download the updated theme and upload it via your FTP account overwriting the existing theme.
REMEMBER: you may have committed custom edits to the functionality of the theme or CSS edits you manually applied. Copy these to reapply later on.
Good themes will allow you to export theme options via the theme options page. Make sure you export your options before uploading the latest version.
After you have updated the theme restore your backup options and reapply the manual edits. This will ensure your theme works as expected.
A good theme will also allow you to use a child theme as the main active theme. This lets you add your custom edits to the child theme rather than the parent. This allows you to update the parent theme safely.
Review your theme changes carefully and take the steps to update with caution!
Lastly, update your plugins. Visit the same update page as before and scroll to plugin updates.
Review any notifications for available plugin updates.
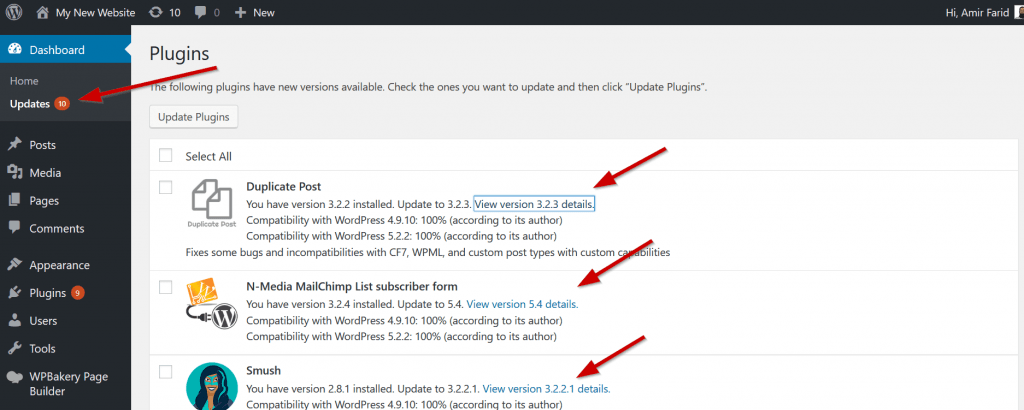
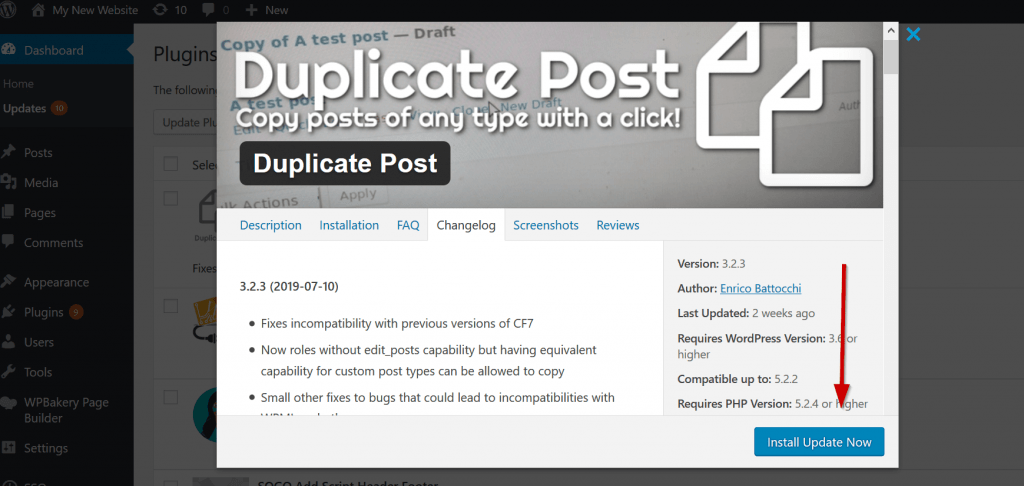
Click on the view version details for the plugin to review the updates. When your happy click the ‘Install update now’ button.
Now that you have cleaned your site, updated your theme and plugins its time to reset all your passwords again.
Revisit step 5. You may be asking why? I already changed them before.
The simple answer is that you are being super cautious. Taking this additional step of changing them again ensures no one will have the most important of passwords. This will help prevent a future hack!
Finally. Restore the permissions and roles for your WordPress users. Its recommended to only have 1 admin user for the site. Don’t forget to update them with their new passwords!
Apply the most appropriate role for your users. The author role is often enough for any user who needs to add content to your site.
All done! Your website should now be clean of any infections, backdoors and malicious code and work perfectly like before it was attacked.
But we are not finished yet. Read on.
Step 7: Post Hack Recommendations
Congratulations, you have recovered your site and removed the hack and infections. BUT that’s not the end.
To make sure this doesn’t happen again here are some recommendations that will keep your WordPress site ultra-secure.
i. Keep up to date
I cannot stress enough how important it is to maintain your site on a regular basis. WordPress is regularly updated to fix bugs, security issues and of course release new features.
Take benefit from that and update WordPress regularly.
You should also review plugin updates during the maintenance window (choose a regular time and date). When you update WordPress, plugins can become incompatible with the latest platform version.
Don’t worry though, for good plugins, authors are quick to fix compatibility issues and release updates fast.
Of course, with plugin updates bugs are also fixed and new features are released.
The same goes for your theme. Check regularly OR opt-in to receive email updates from the theme author to get notified or any theme updates.
Doing maintenance on a regular basis will ensure your platform, theme and plugins are secure and not prone to common hacks as you have already experienced.
Regularly updating also has the added benefit of using code that’s constantly optimised to perform faster than previous versions. It really is a no brainer!
TIP: never ever use nulled plugins or themes. They are riddled with malicious code and backdoors. Using them will result in a hack.
ii. Use a Security plugin
Major access points for hacks occurring on your site can be addressed by using a security plugin.
As an example. When installing WordPress, it adds in the default admin user ID which can be insecure as well as default file permissions.
Rather than outlining all the changes in step 6, I decided to include them here.
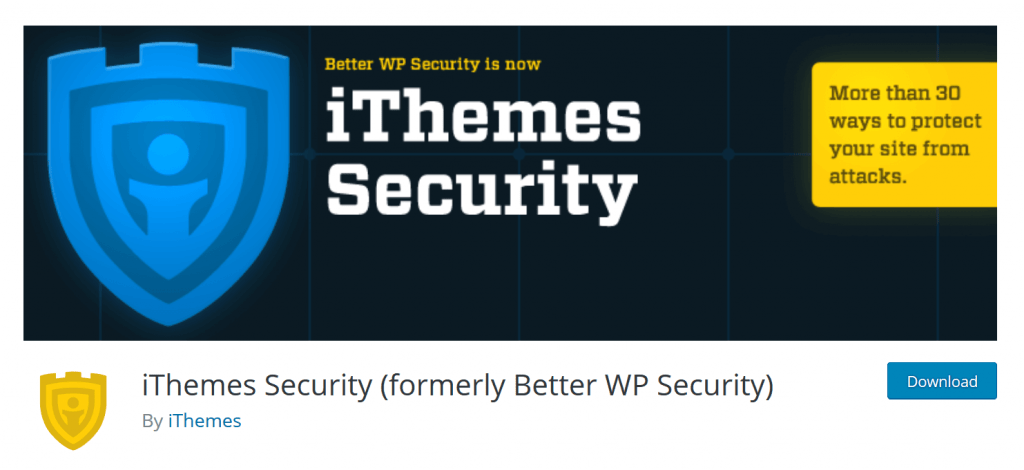
Our most essential plugin for WordPress security which is installed on each site is called iThemes Security.
There are over 30 options some of which include.
- Custom Login URL – This option will allow you to specify a custom login URL rather than using
wp-admin.phpORwp-login.php - Update User 1 ID – By default the username for this ID is admin! This can be quickly changed in the settings screen.
- File Permissions – Important files are locked so that they are only accessible by WordPress.
- File Editor – You can lock access to the file editor so its not available via the WordPress dashboard.
Without fiddling about with any code, using the plugins settings page you can apply different options to fix various holes and potential security issues WordPress may have.
iii. Create backups
If you had a backup of your site prior to the hack, then it would have been a simple case of doing a restore. As you can see you would have saved a lot of time by doing a restore.
Backups can be crucial in restoring a site after a hack (or even hardware failure).
So, the takeaway here is to take regular backups of your site. There really is no excuse.
Every web hosting provider gives you the ability to take backups on call. You don’t need a paid service to take backups.
It only takes 5 mins to take a backup and you should do so on a monthly if not weekly basis. It will save you a lot of time and headache in the event of a hack.
TIP: Things happen. Take an (emergency) backup of your backups! Keep those separate in case your local backup copy gets deleted or corrupted. Use a box.com account or Dropbox account to store your emergency backup.
iv. Remove GWT Malware Warning
Google is quick to pick on hacked websites and then display a malware or security warning to users visiting your site from the search engine.
This can also impact how visible your site is with the search results, especially in the Google search engine.
Now that you have cleaned the site of any infections and hack you will need to get in touch with Google so they can review the site and remove any notifications.
To do this you must log in to your Search Console account and request a review from the security section.
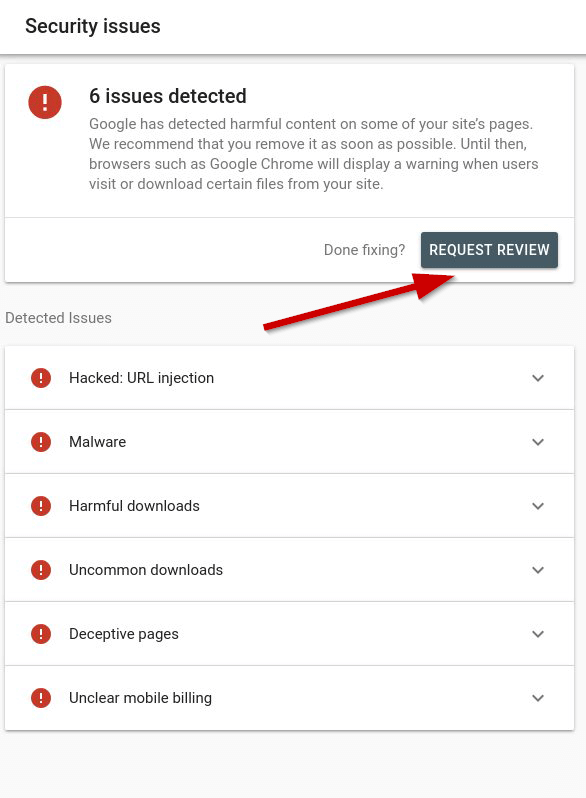
When the site has been reviewed any notifications presented to visitors will be removed.
It may take a short while for you to regain any lost positions with the search results.
Take this 1 step further. Add your site to Bing webmaster and Yandex webmaster. They will most likely have the same security messages for their users.
The process is the same as with Google. Submit the site for review and wait for the security messages to be lifted.
Final thoughts…
Fixing a hacked site is no fun. There is no reassurance one can give after a site is hacked.
You can, however, feel safer now that you have fixed and recovered your website. Safe in the knowledge that any further hack attempts will be thwarted before they can take place with the new security you have implemented.
Maybe this is a good wakeup call for you to take website security and maintenance seriously? In any case, it’s a lesson learned.
For those of you that have yet to experience a hack, keep it that way by using some of the outlined steps to secure your website today!
Finally, if you think something important has been left out or want to share your experience in dealing with a hack then leave a comment below. 😊